harmony 鸿蒙Cross-Device Migration
Cross-Device Migration
Overview
When the environment changes, for example, when a user goes outdoors or when a more appropriate device is detected, the user can migrate an ongoing task to another device for better experience. The application on the source device can automatically exit, depending on the setting. A typical cross-device migration scenario is as follows: The user migrates a video playback task from a tablet to a smart TV. The video application on the tablet exits. From the perspective of application development, cross-device migration enables the UIAbility component running on device A to migrate to and keep running on device B. After the migration is complete, the UIAbility component on device A automatically exits (depending on the setting).
Cross-device migration supports the following features:
Saving and restoring custom data
Saving and restoring page routing information and page component status data
Checking application compatibility
Dynamically setting the migration state (ACTIVE by default)
For example, for an editing application, only the text editing page needs to be migrated to the target device. In this case, you can call setMissionContinueState for precise control.
- Determining whether to restore the page stack (restored by default)
If an application wants to customize the page to be displayed after being migrated to the target device, you can use SUPPORT_CONTINUE_PAGE_STACK_KEY for precise control.
- Determining whether to exit the application on the source device after a successful migration (application exit by default)
You can use SUPPORT_CONTINUE_SOURCE_EXIT_KEY for precise control.
NOTE
You only need to develop an application with the migration capabilities. System applications will trigger cross-device migration.
Working Principles
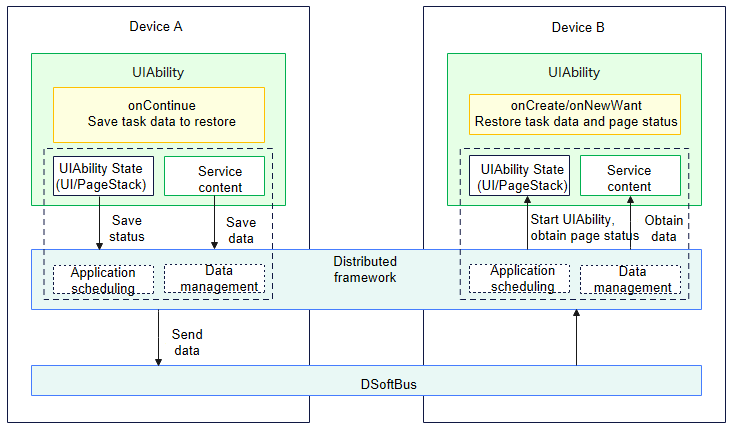
- On the source device, the UIAbility uses the onContinue() callback to save service data to be migrated. For example, to complete cross-device migration, a browser application uses the onContinue() callback to save service data such as the page URL.
- The distributed framework provides a mechanism for saving and restoring application page stacks and service data across devices. It sends the data from the source device to the target device.
- On the target device, the same UIAbility uses the onCreate() callback (in the case of cold start) or onNewWant() callback (in the case of hot start) to restore the service data.
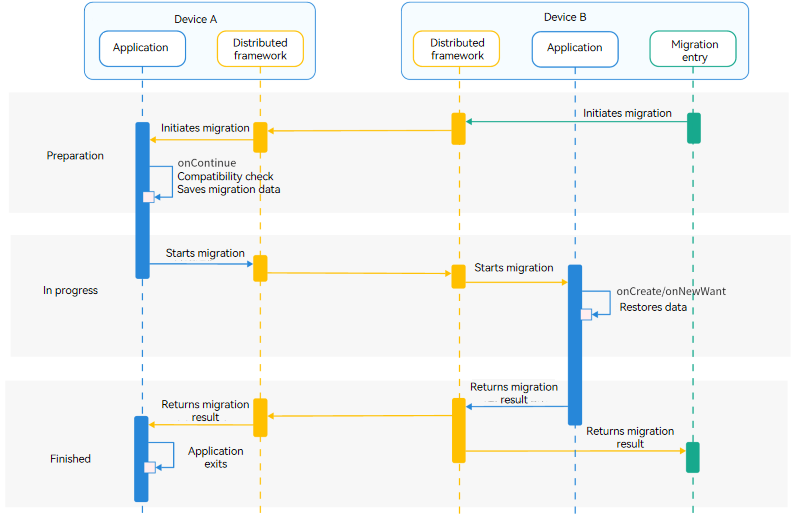
Cross-Device Migration Process
The following figure shows the cross-device migration process when a migration request is initiated from the migration entry of the peer device.
Constraints
- Cross-device migration must be performed between the same UIAbility component. In other words, bundleName, abilityName, and signature of the component on the two devices must be the same.
- For better user experience, the data to be transmitted via the wantParam parameter must be less than 100 KB.
How to Develop
- Configure the continuable tag under abilities in the module.json5 file.
   {
     "module": {
       // ...
       "abilities": [
         {
           // ...
           "continuable": true, // Configure the UIAbility to support migration.
         }
       ]
     }
   }
NOTE
Configure the application launch type. For details, see UIAbility Launch Type.
Implement onContinue() in the UIAbility on the source device.
When a migration is triggered for the UIAbility, onContinue() is called on the source device. You can use either synchronous or asynchronous mode to save the data in this callback to implement application compatibility check and migration decision.
Saving data to migrate: You can save the data to migrate in key-value pairs in wantParam.
(Optional) Checking application compatibility: You can obtain the application version on the target device from wantParam.version in the onContinue() callback and compare it with the application version on the source device. If the version compatibility check fails, the application should notify users of the cause of the migration failure.
NOTE
If the compatibility issues have little or no impact on migration experience, you can skip this check.
- Returning the migration result: You can determine whether migration is supported based on the return value of onContinue(). For details about the return values, see AbilityConstant.OnContinueResult.
Certain fields (listed in the table below) in wantParam passed in to onContinue() are preconfigured in the system. You can use these fields for service processing. When defining custom
wantParamdata, do not use the same keys as the preconfigured ones to prevent data exceptions due to system overwrites.
|Field|Description| |—-|—-| |version|Version the application on the target device.| |targetDevice|Network ID of the target device.|
```ts
import { AbilityConstant, UIAbility } from '@kit.AbilityKit';
import { hilog } from '@kit.PerformanceAnalysisKit';
import { PromptAction } from '@kit.ArkUI';

const TAG: string = '[MigrationAbility]';
const DOMAIN_NUMBER: number = 0xFF00;

export default class MigrationAbility extends UIAbility {
  // Prepare data to migrate in onContinue.
  onContinue(wantParam: Record<string, Object>):AbilityConstant.OnContinueResult {
    let targetVersion = wantParam.version;
    let targetDevice = wantParam.targetDevice;
    hilog.info(DOMAIN_NUMBER, TAG, `onContinue version = ${targetVersion}, targetDevice: ${targetDevice}`);

    // The application can set the minimum compatible version based on the source version, which can be obtained from the versionCode field in the app.json5 file. This is to prevent incompatibility caused because the target version is too earlier.
    let versionThreshold: number = -1; // Use the minimum version supported by the application.
    // Compatibility verification
    let promptAction: promptAction = uiContext.getPromptAction;
    if (targetVersion < versionThreshold) {
      // It is recommended that users be notified of the reason why the migration is rejected if the version compatibility check fails.
      promptAction.showToast({
          message: 'The target application version is too early to continue. Update the application and try again.',
          duration: 2000
      })
      // Return MISMATCH when the compatibility check fails.
      return AbilityConstant.OnContinueResult.MISMATCH;
    }

    // Save the data to migrate in the custom field (for example, data) of wantParam.
    const continueInput = 'Data to migrate';
    wantParam['data'] = continueInput;

    return AbilityConstant.OnContinueResult.AGREE;
  }
}
```
For the UIAbility on the target device, implement onCreate() or onNewWant() to restore the data and load the UI.
The APIs to call vary according to the launch types, as shown below.
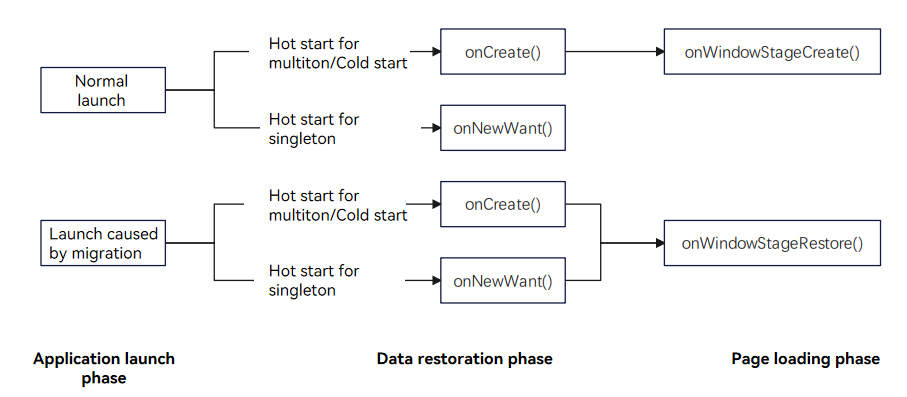
NOTE
When an application is launched as a result of a migration, the onWindowStageRestore() lifecycle callback function, rather than onWindowStageCreate(), is triggered following onCreate() or onNewWant(). This sequence occurs for both cold and hot starts.
If you have performed some necessary initialization operations during application launch in onWindowStageCreate(), you must perform the same initialization operations in onWindowStageRestore() after the migration to avoid application exceptions.
- The launchReason parameter in the onCreate() or onNewWant() callback specifies whether the launch is triggered as a result of a migration (whether the value is CONTINUATION).
- You can obtain the saved data from the want parameter.
- To use system-level page stack restoration, you must call restoreWindowStage() to trigger page restoration with page stacks before onCreate() or onNewWant() is complete. For details, see On-Demand Page Stack Migration.
import { AbilityConstant, UIAbility, Want } from '@kit.AbilityKit';
import { hilog } from '@kit.PerformanceAnalysisKit';


const TAG: string = '[MigrationAbility]';
const DOMAIN_NUMBER: number = 0xFF00;


export default class MigrationAbility extends UIAbility {
  storage : LocalStorage = new LocalStorage();


  onCreate(want: Want, launchParam: AbilityConstant.LaunchParam): void {
    hilog.info(DOMAIN_NUMBER, TAG, '%{public}s', 'Ability onCreate');
    if (launchParam.launchReason === AbilityConstant.LaunchReason.CONTINUATION) {
      // Restore the saved data from want.parameters.
      let continueInput = '';
      if (want.parameters !== undefined) {
        continueInput = JSON.stringify(want.parameters.data);
        hilog.info(DOMAIN_NUMBER, TAG, `continue input ${JSON.stringify(continueInput)}`);
      }
      // Trigger page restoration.
      this.context.restoreWindowStage(this.storage);
    }
  }


  onNewWant(want: Want, launchParam: AbilityConstant.LaunchParam): void {
    hilog.info(DOMAIN_NUMBER, TAG, 'onNewWant');
    if (launchParam.launchReason === AbilityConstant.LaunchReason.CONTINUATION) {
      // Restore the saved data from want.parameters.
      let continueInput = '';
      if (want.parameters !== undefined) {
        continueInput = JSON.stringify(want.parameters.data);
        hilog.info(DOMAIN_NUMBER, TAG, `continue input ${JSON.stringify(continueInput)}`);
      }
      // Trigger page restoration.
      this.context.restoreWindowStage(this.storage);
    }
  }
}
Configuring Optional Migration Features
Dynamically Setting the Migration State
Since API version 10, you can dynamically set the migration state. Specifically, you can enable or disable migration as required by calling setMissionContinueState(). By default, ACTIVE is set for an application, indicating that migration is enabled.
Time for Setting the Migration State
To implement special scenarios, for example, where migration is required only for a specific page or upon a specific event, perform the following steps:
In the onCreate() lifecycle callback of the UIAbility, disable cross-device migration.
// MigrationAbility.ets import { AbilityConstant, UIAbility, Want } from '@kit.AbilityKit'; import { hilog } from '@kit.PerformanceAnalysisKit'; const TAG: string = '[MigrationAbility]'; const DOMAIN_NUMBER: number = 0xFF00; export default class MigrationAbility extends UIAbility { onCreate(want: Want, launchParam: AbilityConstant.LaunchParam): void { // ... this.context.setMissionContinueState(AbilityConstant.ContinueState.INACTIVE, (result) => { hilog.info(DOMAIN_NUMBER, TAG, `setMissionContinueState INACTIVE result: ${JSON.stringify(result)}`); }); // ... } }- To enable cross-device migration for a specific page, call the migration API in onPageShow() of the page.
// Page_MigrationAbilityFirst.ets
import { AbilityConstant, common } from '@kit.AbilityKit';
import { hilog } from '@kit.PerformanceAnalysisKit';


const TAG: string = '[MigrationAbility]';
const DOMAIN_NUMBER: number = 0xFF00;


@Entry
@Component
struct Page_MigrationAbilityFirst {
  private context = this.getUIContext().getHostContext();
  build() {
    // ...
  }
  // ...
  onPageShow(){
    // When the page is displayed, set the migration state to ACTIVE.
    this.context.setMissionContinueState(AbilityConstant.ContinueState.ACTIVE, (result) => {
      hilog.info(DOMAIN_NUMBER, TAG, '%{public}s', `setMissionContinueState ACTIVE result: ${JSON.stringify(result)}`);
    });
  }
}
To enable cross-device migration for a specific event, call the migration API in the event. The following uses the onClick() event of the Button component as an example:
// Page_MigrationAbilityFirst.ets
import { AbilityConstant, common } from '@kit.AbilityKit';
import { hilog } from '@kit.PerformanceAnalysisKit';
import { PromptAction } from '@kit.ArkUI';


const TAG: string = '[MigrationAbility]';
const DOMAIN_NUMBER: number = 0xFF00;


@Entry
@Component
struct Page_MigrationAbilityFirst {
  private context = this.getUIContext().getHostContext();
  let promptAction: promptAction = uiContext.getPromptAction;
  build() {
    Column() {
      //...
      List({ initialIndex: 0 }) {
        ListItem() {
          Row() {
            //...
          }
          .onClick(() => {
            // When the button is clicked, set the migration state to ACTIVE.
            this.context.setMissionContinueState(AbilityConstant.ContinueState.ACTIVE, (result) => {
              hilog.info(DOMAIN_NUMBER, TAG, '%{public}s', `setMissionContinueState ACTIVE result: ${JSON.stringify(result)}`);
              promptAction.showToast({
                message: 'Success'
              });
            });
          })
        }
        //...
      }
      //...
    }
    //...
  }
}
Migrating the Page Stack on Demand
NOTE
Currently, only the page stack implemented based on the router module can be automatically restored. The page stack implemented using the Navigation component cannot be automatically restored.
If an application uses the Navigation component for routing, you can disable default page stack migration by setting SUPPORT_CONTINUE_PAGE_STACK_KEY to false. In addition, save the page (or page stack) to be migrated in want, and manually load the specified page on the target device.
By default, the page stack is restored during the migration of a UIAbility. Before onCreate() or onNewWant() finishes the execution, call restoreWindowStage() to pass in the current window context, which will be used for page stack loading and restoration. The restoreWindowStage() API must be executed in a synchronous API. If it is executed during an asynchronous callback, there is a possibility that the page fails to be loaded during application startup.
The following uses onCreate() as an example:
import { AbilityConstant, UIAbility, Want } from '@kit.AbilityKit';

export default class MigrationAbility extends UIAbility {
  storage : LocalStorage = new LocalStorage();

  onCreate(want: Want, launchParam: AbilityConstant.LaunchParam): void {
      // ...
      // Trigger page restoration before the synchronous API finishes the execution.
      this.context.restoreWindowStage(this.storage);
  }
}
If the application does not want to use the page stack restored by the system, set SUPPORT_CONTINUE_PAGE_STACK_KEY to false, and specify the page to be displayed after the migration in onWindowStageRestore(). If the page to be displayed after the migration is not specified, a blank page will be displayed.
For example, a UIAbility does not want to restore the page stack displayed on the source device. Instead, it wants Page_MigrationAbilityThird to be restored after the migration.
// MigrationAbility.ets
import { AbilityConstant, UIAbility, wantConstant } from '@kit.AbilityKit';
import { hilog } from '@kit.PerformanceAnalysisKit';
import { window } from '@kit.ArkUI';

const TAG: string = '[MigrationAbility]';
const DOMAIN_NUMBER: number = 0xFF00;

export default class MigrationAbility extends UIAbility {
  onContinue(wantParam: Record<string, Object>): AbilityConstant.OnContinueResult {
    // ...
    // Configure not to use the system page stack during restoration.
    wantParam[wantConstant.Params.SUPPORT_CONTINUE_PAGE_STACK_KEY] = false;
    return AbilityConstant.OnContinueResult.AGREE;
  }

  onWindowStageRestore(windowStage: window.WindowStage): void {
    // If the system page stack is not used for restoration, specify the page to be displayed after the migration.
    windowStage.loadContent('pages/page_migrationability/Page_MigrationAbilityThird', (err, data) => {
      if (err.code) {
        hilog.error(DOMAIN_NUMBER, TAG, 'Failed to load the content. Cause: %{public}s', JSON.stringify(err) ?? '');
        return;
      }
    });
  }
}
Exiting the Application on Demand
By default, the application on the source device exits after the migration is complete. If you want the application to continue running on the source device after the migration or perform other operations (such as saving drafts and clearing resources) before exiting on the source device, you can set SUPPORT_CONTINUE_SOURCE_EXIT_KEY to false.
Example: A UIAbility on the source device does not exit after a successful migration.
import { AbilityConstant, UIAbility, wantConstant } from '@kit.AbilityKit';
import { hilog } from '@kit.PerformanceAnalysisKit';

const TAG: string = '[MigrationAbility]';
const DOMAIN_NUMBER: number = 0xFF00;

export default class MigrationAbility extends UIAbility {
  // ...
  onContinue(wantParam: Record<string, Object>): AbilityConstant.OnContinueResult {
    hilog.info(DOMAIN_NUMBER, TAG, `onContinue version = ${wantParam.version}, targetDevice: ${wantParam.targetDevice}`);
    wantParam[wantConstant.Params.SUPPORT_CONTINUE_SOURCE_EXIT_KEY] = false;
    return AbilityConstant.OnContinueResult.AGREE;
  }
}
Migrating Between Abilities in the Same Application Across Devices
Generally, the same ability is involved during a cross-device migration. However, different ability names may be configured for the same service on different device types, resulting in different abilities. To support migration in this scenario, you can configure the continueType flag under abilities in the module.json5 file for association.
The values of the continueType tag of the two abilities must be the same. The following is an example: > NOTE > > The value of continueType must be unique in an application. The value is a string of a maximum of 127 bytes consisting of letters, digits, and underscores (_). > > The continueType tag is a string array. If multiple fields are configured, only the first field takes effect.
   // Device A
   {
     "module": {
       // ...
       "abilities": [
         {
           // ...
           "name": "Ability-deviceA",
           "continueType": ['continueType1'], // Configuration of the continueType tag.
         }
       ]
     }
   }

   // Device B
   {
     "module": {
       // ...
       "abilities": [
         {
           // ...
           "name": "Ability-deviceB",
           "continueType": ['continueType1'], // Same as the value of continueType on device A.
         }
       ]
     }
   }
Migrating Abilities with Different Bundle Names in the Same Application Across Devices
An application may use different bundle names on different devices. To support migration in this scenario, configure abilities in the module.json5 file of the application as follows:
- continueBundleName: bundle name of the application on the peer device.
- continueType: The same value must be used.
NOTE
The value of continueType must be unique in an application. The value is a string of a maximum of 127 bytes consisting of letters, digits, and underscores (_).
The continueType tag is a string array. If multiple fields are configured, only the first field takes effect.
An example is as follows:
An application with different bundle names is migrated between device A and device B. The bundle name of the application on device A is com.demo.example1, and that on device B is com.demo.example2.
// In the configuration file for device A, set continueBundleName to the bundle name of the application on device B.
{
  "module": {
    // ···
    "abilities": [
      {
        "name": "EntryAbility",
        // ···
        "continueType": ["continueType"],
        "continueBundleName": ["com.demo.example2"], // continueBundleName is set to com.demo.example2, which is the bundle name of the application on device B.

      }
    ]

  }
}
// In the configuration file for device B, set continueBundleName to the bundle name of the application on device A.
{
  "module": {
    // ···
    "abilities": [
      {
        "name": "EntryAbility",
        // ···
        "continueType": ["continueType"],
        "continueBundleName": ["com.demo.example1"], // continueBundleName is set to com.demo.example1, which is the bundle name of the application on device A.

      }
    ]

  }
}
Quickly Starting a Target Application
By default, the target application on the peer device is not started immediately when the migration is initiated. It waits until the data to migrate is synchronized from the source device to the peer device. To start the target application immediately upon the initiation of a migration, you can add the _ContinueQuickStart suffix to the value of continueType. In this way, only the migrated data is restored after the data synchronization, delivering an even better migration experience.
   {
     "module": {
       // ...
       "abilities": [
         {
           // ...
           "name": "EntryAbility"
           "continueType": ['EntryAbility_ContinueQuickStart'], // If the continueType tag is configured, add the suffix '_ContinueQuickStart' to its value. If the continueType tag is not configured, you can use AbilityName + '_ContinueQuickStart' as the value of continueType to implement quick startup of the target application.
         }
       ]
     }
   }
With quick start, the target application starts while waiting for the data to migration, minimizing the duration that users wait for the migration to complete. Note that, for the first migration with quick start enabled, the onCreate() or onNewWant() callback is triggered, in which launchReason is PREPARE_CONTINUATION. The introduction of the launchReason parameter solves problems related to redirection and timing. It also provides a loading screen during quick startup.
Since API version 18, an application that displays a loading page during quick launch can obtain the quick startup result during cross-device migration. Depending on this result, the application can take appropriate actions. For example, if the quick startup is successful, the application can dismiss the loading page and proceed to the continuation page.
The following figure shows the quick start process.

For an application configured with quick startup, two start requests are received for a migration. The differences are as follows:
| Scenario | Lifecycle Function | launchParam.launchReason |
|---|---|---|
| First start request | onCreate (in the case of cold start) or onNewWant (in the case of hot start) |
AbilityConstant.LaunchReason.PREPARE_CONTINUATION |
| Second start request | onNewWant | AbilityConstant.LaunchReason.CONTINUATION |
If fast start is not configured, only one start request is received.
| Scenario | Lifecycle Function | launchParam.launchReason |
|---|---|---|
| One start request | onCreate (in the case of cold start) or onNewWant (in the case of hot start) |
AbilityConstant.LaunchReason.CONTINUATION |
When quick start is configured, you also need to implement onCreate() or onNewWant(). The following is an example:
import { AbilityConstant, UIAbility, Want } from '@kit.AbilityKit';
import { hilog } from '@kit.PerformanceAnalysisKit';

const TAG: string = '[MigrationAbility]';
const DOMAIN_NUMBER: number = 0xFF00;

export default class MigrationAbility extends UIAbility {
  storage : LocalStorage = new LocalStorage();

  onCreate(want: Want, launchParam: AbilityConstant.LaunchParam): void {
    hilog.info(DOMAIN_NUMBER, TAG, '%{public}s', 'Ability onCreate');

    // 1. Quick start is configured. Trigger the lifecycle callback when the application is launched immediately.
    if (launchParam.launchReason === AbilityConstant.LaunchReason.PREPARE_CONTINUATION) {
      // If the application data to migrate is large, add a loading screen here (for example, displaying "loading" on the screen).
      // Handle issues related to custom redirection and timing.
      // ...
    }
  }

  onNewWant(want: Want, launchParam: AbilityConstant.LaunchParam): void {
    hilog.info(DOMAIN_NUMBER, TAG, 'onNewWant');

    // 1. Quick start is configured. Trigger the lifecycle callback when the application is launched immediately.
    if (launchParam.launchReason === AbilityConstant.LaunchReason.PREPARE_CONTINUATION) {
      // If the application data to migrate is large, add a loading screen here (for example, displaying "loading" on the screen).
      // Handle issues related to custom redirection and timing.
      // ...
    }

    // 2. Trigger the lifecycle callback when the migration data is restored.
    if (launchParam.launchReason === AbilityConstant.LaunchReason.CONTINUATION) {
      // Restore the saved data from want.parameters.
      let continueInput = '';
      if (want.parameters !== undefined) {
        continueInput = JSON.stringify(want.parameters.data);
        hilog.info(DOMAIN_NUMBER, TAG, `continue input ${JSON.stringify(continueInput)}`);
      }
      // Trigger page restoration.
      this.context.restoreWindowStage(this.storage);
    }
  }
}
When the target application is quickly started, the onWindowStageCreate() and onWindowStageRestore() callbacks are triggered in sequence. Generally, in onWindowStageCreate(), you call loadContent() to load the page. This API throws an asynchronous task to load the home page. This asynchronous task is not synchronous with onWindowStageRestore(). If UI-related APIs (such as route APIs) are used in onWindowStageRestore(), the invoking time may be earlier than the home page loading time. To ensure the normal loading sequence, you can use setTimeout() to throw an asynchronous task for related operations.
The sample code is as follows:
import { UIAbility } from '@kit.AbilityKit';
import { hilog } from '@kit.PerformanceAnalysisKit';
import { UIContext, window } from '@kit.ArkUI';

export default class EntryAbility extends UIAbility {
  private uiContext: UIContext|undefined = undefined;

  // ...

  onWindowStageCreate(windowStage: window.WindowStage): void {
    hilog.info(0x0000, 'testTag', '%{public}s', 'Ability onWindowStageCreate');

    windowStage.loadContent('pages/Index', (err) => {
      if (err.code) {
        hilog.error(0x0000, 'testTag', 'Failed to load the content. Cause: %{public}s', JSON.stringify(err) ?? '');
        return;
      }
      this.uiContext = windowStage.getMainWindowSync().getUIContext();
      hilog.info(0x0000, 'testTag', 'Succeeded in loading the content.');
    });
  }

  onWindowStageRestore(windowStage: window.WindowStage): void {
    setTimeout(() => {
      // Throw the asynchronous task execution route to ensure that the task is executed after the home page is loaded.
      this.uiContext?.getRouter().pushUrl({
        url: 'pages/examplePage'
      });
    }, 0);
  }

  // ...
}
Cross-Device Data Migration
Two data migration modes are provided. You can select either of them as required. > NOTE > > Through the configuration of restoreId, certain ArkUI components can be restored to a given state on the target device after migration. For details, see restoreId. > > If distributed data objects need to be migrated, you must perform the following operations (required only in API version 11 and earlier versions): > > 1. Declare the ohos.permission.DISTRIBUTED_DATASYNC permission. For details, see Declaring Permissions. > > 2. Display a dialog box to ask for authorization from the user when the application is started for the first time. For details, see Requesting User Authorization.
Using wantParam for Data Migration
If the size of the data to migrate is less than 100 KB, you can add fields to wantParam to migrate the data. An example is as follows:
import { AbilityConstant, UIAbility, Want } from '@kit.AbilityKit';
import { hilog } from '@kit.PerformanceAnalysisKit';

const TAG: string = '[MigrationAbility]';
const DOMAIN_NUMBER: number = 0xFF00;

export default class MigrationAbility extends UIAbility {
  storage: LocalStorage = new LocalStorage();

  // Save the data on the source device.
  onContinue(wantParam: Record<string, Object>): AbilityConstant.OnContinueResult {
    // Save the data to migrate in the custom field (for example, data) of wantParam.
    const continueInput = 'Data to migrate';
    wantParam['data'] = continueInput;
    return AbilityConstant.OnContinueResult.AGREE;
  }

  // Restore the data on the target device.
  onCreate(want: Want, launchParam: AbilityConstant.LaunchParam): void {
    if (launchParam.launchReason === AbilityConstant.LaunchReason.CONTINUATION) {
      // Obtain the data saved.
      let continueInput = '';
      if (want.parameters !== undefined) {
        continueInput = JSON.stringify(want.parameters.data);
        hilog.info(DOMAIN_NUMBER, TAG, `continue input ${continueInput}`);
      }
      // Trigger page restoration.
      this.context.restoreWindowStage(this.storage);
    }
  }

  onNewWant(want: Want, launchParam: AbilityConstant.LaunchParam): void {
    if (launchParam.launchReason === AbilityConstant.LaunchReason.CONTINUATION) {
      let continueInput = '';
      if (want.parameters !== undefined) {
        continueInput = JSON.stringify(want.parameters.data);
        hilog.info(DOMAIN_NUMBER, TAG, `continue input ${JSON.stringify(continueInput)}`);
      }
      // Trigger page restoration.
      this.context.restoreWindowStage(this.storage);
    }
  }
}
Using Distributed Data Objects for Data Migration
If the size of the data to migrate is greater than 100 KB or a file needs to be migrated, you can use a distributed data object to implement data migration. For details, see Cross-Device Synchronization of Distributed Data Objects.
NOTE
Since API version 12, it is difficult to obtain the file synchronization completion time when cross-device file access is used to migrate a file. To ensure a higher success rate, you are advised to use distributed data objects to carry assets. File migration implemented through cross-device file access still takes effect.
Basic Data Migration
To use a distributed data object, you must save data in the onContinue() API on the source device and restore data in the onCreate() or onNewWant() API of the target device.
On the source device, save the data to migrate to a distributed data object.
- Use create() in onContinue() to create a distributed data object and add the data to migrate to the object.
- Use genSessionId() to generate a data object network ID, use the ID to call setSessionId() to add the data object to the network, and activate the distributed data object.
- Use save() to persist the activated distributed data object to ensure that the peer device can still obtain data after the application exits from the source device.
- The generated session ID is transferred to the peer device through want for activation and synchronization purposes.
NOTE
Distributed data objects must be activated before being made persistent. Therefore, the save() API must be called after setSessionId().
For applications that need to exit from the source device after migration, use await to wait until the save() API finishes execution. This prevents the application from exiting before data is saved. Since API version 12, an asynchronous onContinue() API is provided for this scenario.
Currently, the sessionId field in wantParams is occupied by the system in the migration process. You are advised to define another key in wantParams to store the ID to avoid data exceptions.
The sample code is as follows:
// Import the modules.
import { distributedDataObject } from '@kit.ArkData';
import { UIAbility, AbilityConstant } from '@kit.AbilityKit';
import { BusinessError } from '@kit.BasicServicesKit';
import { hilog } from '@kit.PerformanceAnalysisKit';

const TAG: string = '[MigrationAbility]';
const DOMAIN_NUMBER: number = 0xFF00;

// Define service data.
class ParentObject {
  mother: string
  father: string

  constructor(mother: string, father: string) {
    this.mother = mother
    this.father = father
  }
}

// Strings, digits, Boolean values, and objects can be transferred.
class SourceObject {
  name: string|undefined
  age: number|undefined
  isVis: boolean|undefined
  parent: ParentObject|undefined

  constructor(name: string|undefined, age: number|undefined, isVis: boolean|undefined, parent: ParentObject|undefined) {
    this.name = name
    this.age = age
    this.isVis = isVis
    this.parent = parent
  }
}

export default class MigrationAbility extends UIAbility {
  d_object?: distributedDataObject.DataObject;

  async onContinue(wantParam: Record<string, Object>): Promise<AbilityConstant.OnContinueResult> {
    // ...
    let parentSource: ParentObject = new ParentObject('jack mom', 'jack Dad');
    let source: SourceObject = new SourceObject("jack", 18, false, parentSource);

    // Create a distributed data object.
    this.d_object = distributedDataObject.create(this.context, source);

    // Generate a data object network ID and activate the distributed data object.
    let dataSessionId: string = distributedDataObject.genSessionId();
    this.d_object.setSessionId(dataSessionId);

    // Transfer the network ID to the peer device.
    wantParam['dataSessionId'] = dataSessionId;

    // Persist the data object to ensure that the peer device can restore the data object even if the application exits after the migration.
    // Obtain the network ID of the peer device from wantParam.targetDevice as an input parameter.
    await this.d_object.save(wantParam.targetDevice as string).then((result:
      distributedDataObject.SaveSuccessResponse) => {
      hilog.info(DOMAIN_NUMBER, TAG, `Succeeded in saving. SessionId: ${result.sessionId}`,
        `version:${result.version}, deviceId:${result.deviceId}`);
    }).catch((err: BusinessError) => {
      hilog.error(DOMAIN_NUMBER, TAG, 'Failed to save. Error: ', JSON.stringify(err) ?? '');
    });

    return AbilityConstant.OnContinueResult.AGREE;
  }
}
In onCreate() or onNewWant(), the peer device adds the same distributed data object as the source device for networking, in order to restore data.
- Create an empty distributed data object to receive restored data.
- Read the network ID of the distributed data object from want.
- Register on() to listen for data changes. In the event callback indicating that status is restore, implement the service operations that need to be performed when the data restoration is complete.
- Call setSessionId() to add the data object to the network, and activate the distributed data object.
NOTE
The distributed data object of the peer device to be added to the network cannot be a temporary variable. This is because the callback of the on() API may be executed after onCreate() or onNewWant() finishes execution. If the temporary variable is released, a null pointer exception may occur. You can use a class member variable to avoid this problem.
The attributes of the object used to create the distributed data object on the peer device must be undefined before the distributed data object is activated. Otherwise, the source data will be overwritten after new data is added to the network, and data restoration will fail.
Before activating the distributed data object, call on() to listen for the restore event. This helps prevent data restoration failure caused by event missing.
The sample code is as follows:
import { AbilityConstant, UIAbility, Want } from '@kit.AbilityKit';
import { distributedDataObject } from '@kit.ArkData';
import { hilog } from '@kit.PerformanceAnalysisKit';

const TAG: string = '[MigrationAbility]';
const DOMAIN_NUMBER: number = 0xFF00;

// The definition of the example data object is the same as above.
export default class MigrationAbility extends UIAbility {
  d_object?: distributedDataObject.DataObject;

  onCreate(want: Want, launchParam: AbilityConstant.LaunchParam): void {
    if (launchParam.launchReason === AbilityConstant.LaunchReason.CONTINUATION) {
      // ...
      // Call the encapsulated distributed data object processing function.
      this.handleDistributedData(want);
    }
  }

  onNewWant(want: Want, launchParam: AbilityConstant.LaunchParam): void {
    if (launchParam.launchReason === AbilityConstant.LaunchReason.CONTINUATION) {
      if (want.parameters !== undefined) {
        // ...
        // Call the encapsulated distributed data object processing function.
        this.handleDistributedData(want);
      }
    }
  }

  handleDistributedData(want: Want) {
    // Create an empty distributed data object.
    let remoteSource: SourceObject = new SourceObject(undefined, undefined, undefined, undefined);
    this.d_object = distributedDataObject.create(this.context, remoteSource);

    // Read the network ID of the distributed data object.
    let dataSessionId = '';
    if (want.parameters !== undefined) {
      dataSessionId = want.parameters.dataSessionId as string;
    }

    // Add a data change listener.
    this.d_object.on("status", (sessionId: string, networkId: string, status: 'online'|'offline'|'restored') => {
      hilog.info(DOMAIN_NUMBER, TAG, "status changed " + sessionId + " " + status + " " + networkId);
      if (status == 'restored') {
        if (this.d_object) {
          // Read data from the distributed data object when the restore status is received.
          hilog.info(DOMAIN_NUMBER, TAG, "restored name:" + this.d_object['name']);
          hilog.info(DOMAIN_NUMBER, TAG, "restored parents:" + JSON.stringify(this.d_object['parent']));
        }
      }
    });

    // Activate the distributed data object.
    this.d_object.setSessionId(dataSessionId);
  }
}
File Migration
A file, such as an image or document, must be converted to the commonType.Asset type before being encapsulated into a distributed data objects for migration. The migration implementation is similar to that of a common distributed data object. The following describes only the differences.
On the source device, save the file asset to migrate to a distributed data object.
- Copy the file asset to the distributed file directory. For details about related APIs and usage, see basic file APIs.
- Use the file in the distributed file directory to create an asset object.
- Save the asset object as the root attribute of the distributed data object.
Then, add the data object to the network and persist it. The procedure is the same as the migration of a common data object on the source device.
An example is as follows:
// Import the modules.
import { UIAbility, AbilityConstant } from '@kit.AbilityKit';
import { distributedDataObject, commonType } from '@kit.ArkData';
import { fileIo, fileUri } from '@kit.CoreFileKit';
import { hilog } from '@kit.PerformanceAnalysisKit';
import { BusinessError } from '@ohos.base';

const TAG: string = '[MigrationAbility]';
const DOMAIN_NUMBER: number = 0xFF00;

// Define a data object.
class ParentObject {
  mother: string
  father: string

  constructor(mother: string, father: string) {
    this.mother = mother
    this.father = father
  }
}

class SourceObject {
  name: string|undefined
  age: number|undefined
  isVis: boolean|undefined
  parent: ParentObject|undefined
  attachment: commonType.Asset|undefined // New asset attribute.

  constructor(name: string|undefined, age: number|undefined, isVis: boolean|undefined,
              parent: ParentObject|undefined, attachment: commonType.Asset|undefined) {
    this.name = name
    this.age = age
    this.isVis = isVis
    this.parent = parent
    this.attachment = attachment;
  }
}

export default class MigrationAbility extends UIAbility {
  d_object?: distributedDataObject.DataObject;

  async onContinue(wantParam: Record<string, Object>): Promise<AbilityConstant.OnContinueResult> {
    // ...

    // 1. Write the asset to the distributed file directory.
    let distributedDir: string = this.context.distributedFilesDir; // Obtain the distributed file directory.
    let fileName: string = '/test.txt'; // File name.
    let filePath: string = distributedDir + fileName; // File path.

    try {
      // Create a file in the distributed directory.
      let file = fileIo.openSync(filePath, fileIo.OpenMode.READ_WRITE|fileIo.OpenMode.CREATE);
      hilog.info(DOMAIN_NUMBER, TAG, 'Create file success.');
      // Write content to the file. (If the asset is an image, convert the image into a buffer and write the buffer.)
      fileIo.writeSync(file.fd, '[Sample] Insert file content here.');
      // Close the file.
      fileIo.closeSync(file.fd);
    } catch (error) {
      let err: BusinessError = error as BusinessError;
      hilog.error(DOMAIN_NUMBER, TAG, `Failed to openSync / writeSync / closeSync. Code: ${err.code}, message: ${err.message}`);
    }

    // 2. Use the file in the distributed file directory to create an asset object.
    let distributedUri: string = fileUri.getUriFromPath(filePath); // Obtain the URI of the distributed file.

    // Obtain file parameters.
    let ctime: string = '';
    let mtime: string = '';
    let size: string = '';
    await fileIo.stat(filePath).then((stat: fileIo.Stat) => {
      ctime = stat.ctime.toString(); // Creation time
      mtime = stat.mtime.toString(); // Modification time
      size = stat.size.toString(); // File size
    })

    // Create an asset object.
    let attachment: commonType.Asset = {
      name: fileName,
      uri: distributedUri,
      path: filePath,
      createTime: ctime,
      modifyTime: mtime,
      size: size,
    }

    // 3. Use the asset object as the root attribute of the distributed data object to create a distributed data object.
    let parentSource: ParentObject = new ParentObject('jack mom', 'jack Dad');
    let source: SourceObject = new SourceObject("jack", 18, false, parentSource, attachment);
    this.d_object = distributedDataObject.create(this.context, source);

    // Generate a network ID, activate the distributed data object, and save the data persistently.
    // ...

    return AbilityConstant.OnContinueResult.AGREE;
  }
}
The target application must create an asset object whose attributes are empty as the root attribute of the distributed data object. When the on() event callback in which status is restored is received, the data synchronization including the asset is complete. The asset object of source application can be obtained in the same way as the basic data.
NOTE
When the target application creates the distributed data object, the assets in the SourceObject object cannot be directly initialized using undefined. You need to create an asset object whose initial values of all attributes are empty so that the distributed object can identify the asset type.
import { UIAbility, Want } from '@kit.AbilityKit';
import { distributedDataObject, commonType } from '@kit.ArkData';
import { hilog } from '@kit.PerformanceAnalysisKit';

const TAG: string = '[MigrationAbility]';
const DOMAIN_NUMBER: number = 0xFF00;

export default class MigrationAbility extends UIAbility {
  d_object?: distributedDataObject.DataObject;

  handleDistributedData(want: Want) {
    // ...
    // Create an asset object whose attributes are empty.
    let attachment: commonType.Asset = {
      name: '',
      uri: '',
      path: '',
      createTime: '',
      modifyTime: '',
      size: '',
    }

    // Use the empty asset object to create a distributed data object. Other basic attributes can be directly set to undefined.
    let source: SourceObject = new SourceObject(undefined, undefined, undefined, undefined, attachment);
    this.d_object = distributedDataObject.create(this.context, source);

    this.d_object.on("status", (sessionId: string, networkId: string, status: 'online'|'offline'|'restored') => {
      if (status == 'restored') {
        if (this.d_object) {
          // The restored event callback is received, indicating that the synchronization of the distributed asset object is complete.
          hilog.info(DOMAIN_NUMBER, TAG, "restored attachment:" + JSON.stringify(this.d_object['attachment']));
        }
      }
    });
    // ...
  }
}
If you want to synchronize multiple assets, use either of the following methods:
- Method 1: Implement each asset as a root attribute of the distributed data object. This applies to scenarios where the number of assets to migrate is fixed.
- Method 2: Transfer the asset array as an object. This applies to scenarios where the number of assets to migrate changes dynamically (for example, a user selects a variable number of images). Currently, the asset array cannot be directly transferred as the root attribute.
To implement method 1, you can add more assets by referring to the method of adding an asset. To implement method 2, refer to the code snippet below:
// Import the modules.
import { distributedDataObject, commonType } from '@kit.ArkData';
import { UIAbility } from '@kit.AbilityKit';

// Define a data object.
class SourceObject {
  name: string|undefined
  assets: Object|undefined // Add an object attribute to the distributed data object.

  constructor(name: string|undefined, assets: Object|undefined) {
    this.name = name
    this.assets = assets;
  }
}

export default class MigrationAbility extends UIAbility {
  d_object?: distributedDataObject.DataObject;

  // This API is used to convert an asset array into a record.
  GetAssetsWapper(assets: commonType.Assets): Record<string, commonType.Asset> {
    let wrapper: Record<string, commonType.Asset> = {}
    let num: number = assets.length;
    for (let i: number = 0; i < num; i++) {
      wrapper[`asset${i}`] = assets[i];
    }
    return wrapper;
  }

  async onContinue(wantParam: Record<string, Object>): AbilityConstant.OnContinueResult {
    // ...

    // Create multiple asset objects.
    let attachment1: commonType.Asset = {
      // ...
    }

    let attachment2: commonType.Asset = {
      // ...
    }

    // Insert the asset objects into the asset array.
    let assets: commonType.Assets = [];
    assets.push(attachment1);
    assets.push(attachment2);

    // Convert the asset array into a record object and use it to create a distributed data object.
    let assetsWrapper: Object = this.GetAssetsWapper(assets);
    let source: SourceObject = new SourceObject("jack", assetsWrapper);
    this.d_object = distributedDataObject.create(this.context, source);

    // ...
  }
}
Verification Guide
A mission center demo is provided for you to verify the migration capability of your application. The following walks you through on how to verify migration by using the demo.
NOTE
The screenshots in this section are for reference only. The DevEco Studio and SDK versions in use prevail.
Compiling and Installing the Demo
Switch to the full SDK to compile and install the mission center.
Download the sample code of the mission center demo.
Build the project file.
Create an empty project and replace the corresponding folders with the downloaded files.
Complete the signature, build, and installation. The default signature permission provided by the automatic signature template of DevEco Studio is normal. The mission center demo requires the ohos.permission.MANAGE_MISSIONS permission, which is at the system_core level. Therefore, you must escalate the permission to the system_core level.
Change “apl”:“normal” to “apl”:“system_core” in the UnsignedReleasedProfileTemplate.json file in openharmony\apiVersion\toolchains\lib, where apiVersion is a digit, for example, 10.
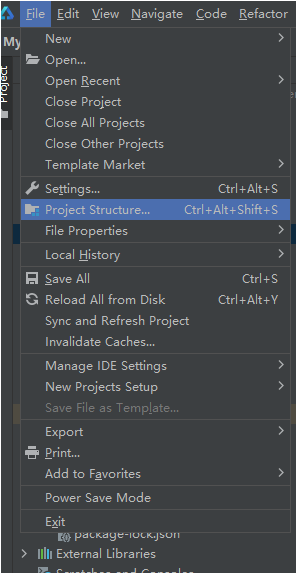
Choose File > Project Structure.
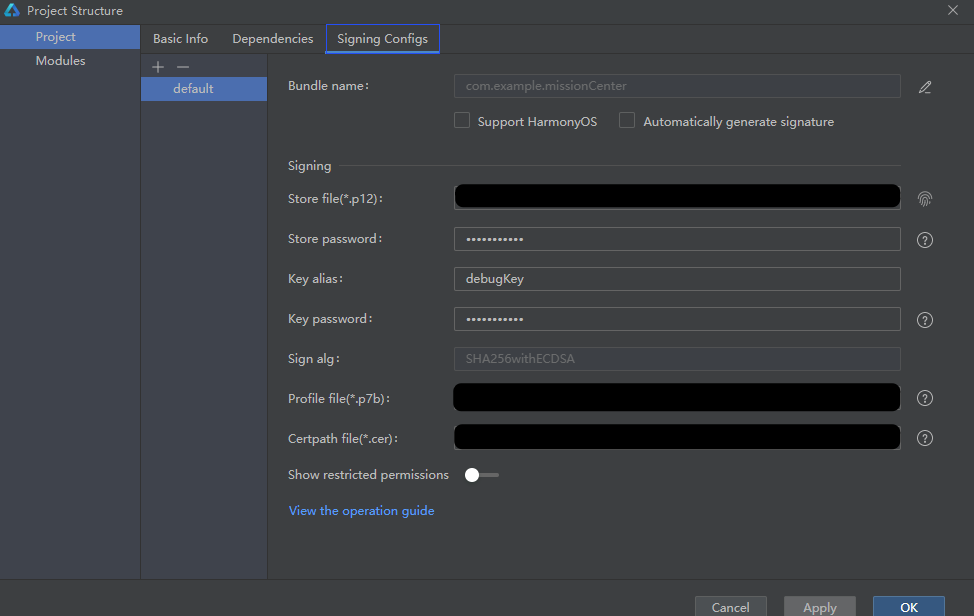
- Click Signing Configs and click OK.
- Connect to the developer board and run the demo.
Device Networking
- Open the calculators of devices A and B.
- Click the arrow in the upper right corner to select device B.
- Select a trusted device on device B. The PIN is displayed.
- Enter the PIN on device A.
- Verify the networking. Enter a number on device A. If the number is displayed on device B, the networking is successful.
Initiation Migration
- Open your application on device B, and open the mission center demo on device A. The name of device A and the name of device B are displayed on the mission center demo.
- Touch the name of device B. The application card list of device B is displayed.
- Drag the application card to be connected to the name of device A. The application on device A is started.
FAQs
Q1: What Can I Do If the Application Cannot Be Migrated Back to the Source Device?
The migration state is set at the ability level. The application on the target device may have executed the command to set its own migration state (for example, set the state to INACTIVE in onCreate() during cold start or to INACTIVE during hot start since the application has opened a page that cannot be migrated). To ensure a migration back to the source device, you must set the migration state to ACTIVE in onCreate() or onNewWant().
// MigrationAbility.ets
import { AbilityConstant, UIAbility, Want } from '@kit.AbilityKit';
import { hilog } from '@kit.PerformanceAnalysisKit';

const TAG: string = '[MigrationAbility]';
const DOMAIN_NUMBER: number = 0xFF00;

export default class MigrationAbility extends UIAbility {
  // ...
  onCreate(want: Want, launchParam: AbilityConstant.LaunchParam): void {
    // ...
    if (launchParam.launchReason === AbilityConstant.LaunchReason.CONTINUATION) {
      // ...
      // Set the migration state to ACTIVE when the launch is caused by migration. This setting copes with cold start.
      this.context.setMissionContinueState(AbilityConstant.ContinueState.ACTIVE, (result) => {
        hilog.info(DOMAIN_NUMBER, TAG, `setMissionContinueState ACTIVE result: ${JSON.stringify(result)}`);
      });
    }
    // ...
  }

  onNewWant(want: Want, launchParam: AbilityConstant.LaunchParam): void {
    // ...
    // Set the migration state to ACTIVE when the launch is caused by migration. This setting copes with hot start.
    if (launchParam.launchReason === AbilityConstant.LaunchReason.CONTINUATION) {
      this.context.setMissionContinueState(AbilityConstant.ContinueState.ACTIVE, (result) => {
        hilog.info(DOMAIN_NUMBER, TAG, `setMissionContinueState ACTIVE result: ${JSON.stringify(result)}`);
      });
    }
  }
  // ...
}
Q2: What Can I Do If the Call of loadContent() Does Not Take Effect in onWindowStageRestore()?
If page stack migration is not disabled for an application, the system migrates and loads the page stack of the application by default. In this case, if you use loadContent() to trigger the loading of a specific page in the onWindowStageRestore() lifecycle callback function, the loading does not take effect and the page in the page stack is still restored.
你可能感兴趣的鸿蒙文章
harmony 鸿蒙Obtaining Reasons for Abnormal Application Exits
harmony 鸿蒙UIAbility Backup and Restore
harmony 鸿蒙Using Explicit Want to Start an Application Component
harmony 鸿蒙Introduction to Ability Kit
harmony 鸿蒙AbilityStage Component Container
harmony 鸿蒙Accessing a DataAbility
harmony 鸿蒙Accessing a DataShareExtensionAbility from the FA Model
harmony 鸿蒙Common action and entities Values (Not Recommended)
- 所属分类: 后端技术
- 本文标签:
热门推荐
-
2、 优质文章
-
3、 gt
-
7、 openharmony
-
9、 golang
-
10、 Vue中input框自动聚焦