harmony 鸿蒙CanvasGradient
CanvasGradient
渐变对象。
说明:
从 API version 8 开始支持。后续版本如有新增内容,则采用上角标单独标记该内容的起始版本。
addColorStop
addColorStop(offset: number, color: string): void
设置渐变断点值,包括偏移和颜色。
卡片能力: 从API version 9开始,该接口支持在ArkTS卡片中使用。
原子化服务API: 从API version 11开始,该接口支持在原子化服务中使用。
系统能力: SystemCapability.ArkUI.ArkUI.Full
参数:
| 参数名 | 类型 | 必填 | 说明 |
|---|---|---|---|
| offset | number | 是 | 设置渐变点距离起点的位置占总体长度的比例,范围为[0, 1]。设置offset<0或offset>1无渐变效果。 |
| color | string | 是 | 设置渐变的颜色。颜色格式参考ResourceColor中string类型说明。未按格式设置颜色无渐变效果。 |
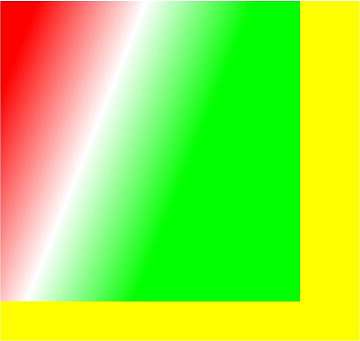
示例:
通过addColorStop设置渐变断点值,包括偏移和颜色。
  // xxx.ets
  @Entry
  @Component
  struct AddColorStop {
    private settings: RenderingContextSettings = new RenderingContextSettings(true);
    private context: CanvasRenderingContext2D = new CanvasRenderingContext2D(this.settings);

    build() {
      Flex({ direction: FlexDirection.Column, alignItems: ItemAlign.Center, justifyContent: FlexAlign.Center }) {
        Canvas(this.context)
          .width('100%')
          .height('100%')
          .backgroundColor('#ffff00')
          .onReady(() => {
            let grad = this.context.createLinearGradient(50, 0, 300, 100)
            grad.addColorStop(0.0, '#ff0000')
            grad.addColorStop(0.5, '#ffffff')
            grad.addColorStop(1.0, '#00ff00')
            this.context.fillStyle = grad
            this.context.fillRect(0, 0, 400, 400)
          })
      }
      .width('100%')
      .height('100%')
    }
  }
## addColorStop20+
addColorStop(offset: number, color: ColorMetrics): void
设置渐变断点值,包括偏移和颜色。
卡片能力: 从API version 20开始,该接口支持在ArkTS卡片中使用。
原子化服务API: 从API version 20开始,该接口支持在原子化服务中使用。
系统能力: SystemCapability.ArkUI.ArkUI.Full
参数:
| 参数名 | 类型 | 必填 | 说明 |
|---|---|---|---|
| offset | number | 是 | 设置渐变点距离起点的位置占总体长度的比例,范围为[0, 1]。设置offset<0或offset>1无渐变效果。 |
| color | ColorMetrics | 是 | 设置渐变填充的颜色。可以使用colorWithSpace方法构造指定色域属性ColorSpace为SRGB或DISPLAY_P3的颜色。每个渐变ColorMetrics的色域属性应当统一,设置不同色域的属性时将抛出异常。设置null和undefined无效。 |
说明:
仅CanvasRenderingContext2D对象的fillStyle和strokeStyle属性支持设置P3广色域的CanvasGradient对象,且需要将Canvas组件所在窗口的色域模式通过setWindowColorSpace方法设置为广色域模式WIDE_GAMUT。
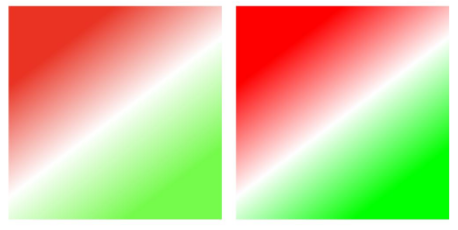
示例:
通过addColorStop设置指定色域的渐变断点值,包括偏移和颜色。设置窗口色域模式为广色域参照方法setWindowColorSpace。
// xxx.ets
import { ColorMetrics } from '@kit.ArkUI'

@Entry
@Component
struct AddColorStop {
  private settings: RenderingContextSettings = new RenderingContextSettings(true);
  private context: CanvasRenderingContext2D = new CanvasRenderingContext2D(this.settings);

  build() {
    Flex({ direction: FlexDirection.Column, alignItems: ItemAlign.Center, justifyContent: FlexAlign.Center }) {
      Canvas(this.context)
        .width('100%')
        .height('100%')
        .onReady(() => {
          // 设置fillStyle为SRGB色域效果的gradient。
          let gradSRGB = this.context.createLinearGradient(85, 10, 160, 110)
          gradSRGB.addColorStop(0.0, ColorMetrics.colorWithSpace(ColorSpace.SRGB, 1.0, 0.0, 0.0, 1.0))
          gradSRGB.addColorStop(0.5, ColorMetrics.colorWithSpace(ColorSpace.SRGB, 1.0, 1.0, 1.0, 1.0))
          gradSRGB.addColorStop(1.0, ColorMetrics.colorWithSpace(ColorSpace.SRGB, 0.0, 1.0, 0.0, 1.0))
          this.context.fillStyle = gradSRGB
          this.context.fillRect(10, 10, 150, 150)

          // 设置fillStyle为DISPLAY_P3色域效果的gradient。
          let gradP3 = this.context.createLinearGradient(245, 10, 320, 110)
          gradP3.addColorStop(0.0, ColorMetrics.colorWithSpace(ColorSpace.DISPLAY_P3, 1.0, 0.0, 0.0, 1.0))
          gradP3.addColorStop(0.5, ColorMetrics.colorWithSpace(ColorSpace.DISPLAY_P3, 1.0, 1.0, 1.0, 1.0))
          gradP3.addColorStop(1.0, ColorMetrics.colorWithSpace(ColorSpace.DISPLAY_P3, 0.0, 1.0, 0.0, 1.0))
          this.context.fillStyle = gradP3
          this.context.fillRect(170, 10, 150, 150)
        })
    }
    .width('100%')
    .height('100%')
  }
}
你可能感兴趣的鸿蒙文章
0
赞
- 所属分类: 后端技术
- 本文标签:
热门推荐
-
2、 优质文章
-
3、 gt
-
7、 openharmony
-
9、 golang
-
10、 Vue中input框自动聚焦