harmony 鸿蒙使用PixelMap完成位图操作
使用PixelMap完成位图操作
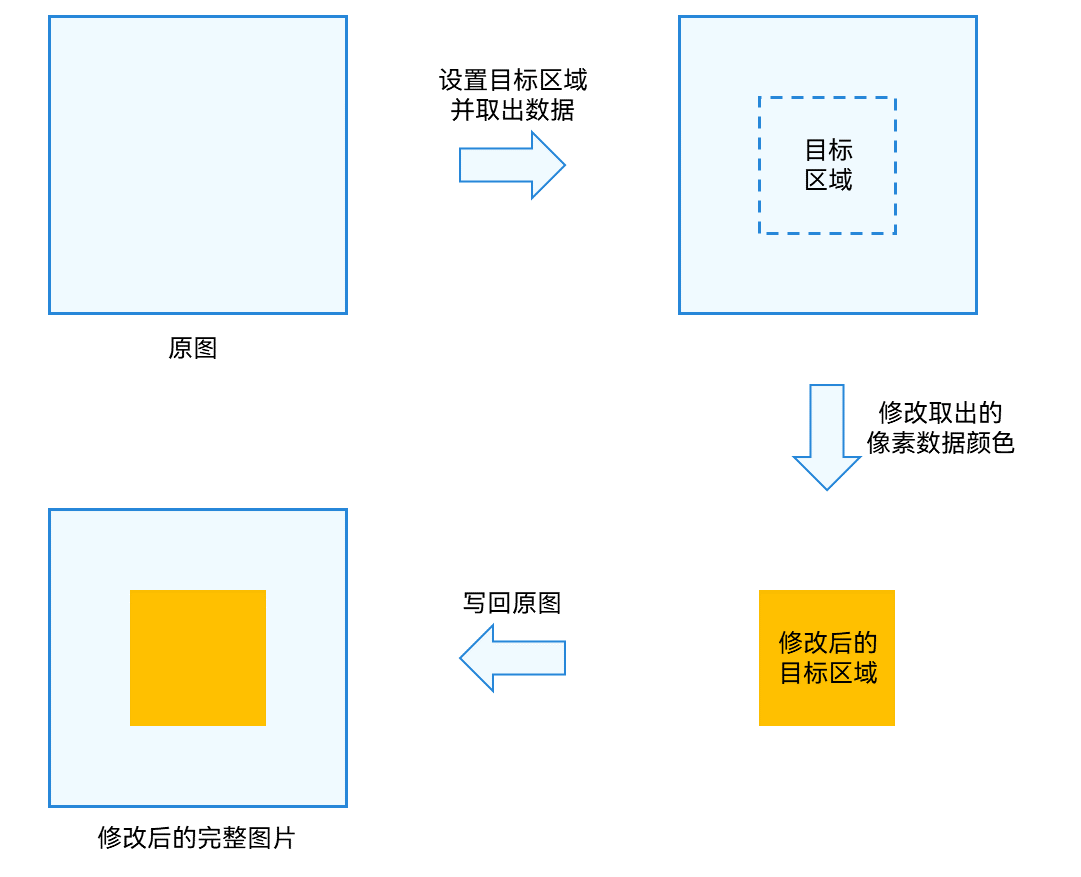
当需要对目标图片中的部分区域进行处理时,可以使用位图操作功能。此功能常用于图片美化等操作。
如下图所示,一张图片中,将指定的矩形区域像素数据读取出来,进行修改后,再写回原图片对应区域。
图1 位图操作示意图
开发步骤
位图操作相关API的详细介绍请参见API参考。
完成图片解码,获取PixelMap位图对象。
从PixelMap位图对象中获取信息。
   import { image } from '@kit.ImageKit';
   // 获取图像像素的总字节数。
   let pixelBytesNumber : number = pixelMap.getPixelBytesNumber();
   // 获取图像像素每行字节数。
   let rowBytes : number = pixelMap.getBytesNumberPerRow();
   // 获取当前图像像素密度。像素密度是指每英寸图片所拥有的像素数量。像素密度越大,图片越精细。
   let density : number = pixelMap.getDensity();
- 读取并修改目标区域像素数据,写回原图。 > 说明: > 建议readPixelsToBuffer和writeBufferToPixels成对使用,readPixels和writePixels成对使用,避免因图像像素格式不一致,造成PixelMap图像出现异常。
   import { BusinessError } from '@kit.BasicServicesKit';
   // 场景一:读取并修改整张图片数据。
   // 按照PixelMap的像素格式,读取PixelMap的图像像素数据,并写入缓冲区中。
   const buffer = new ArrayBuffer(pixelBytesNumber);
   pixelMap.readPixelsToBuffer(buffer).then(() => {
     console.info('Succeeded in reading image pixel data.');
   }).catch((error : BusinessError) => {
     console.error('Failed to read image pixel data. The error is: ' + error);
   })
   // 按照PixelMap的像素格式,读取缓冲区中的图像像素数据,并写入PixelMap。
   pixelMap.writeBufferToPixels(buffer).then(() => {
     console.info('Succeeded in writing image pixel data.');
   }).catch((error : BusinessError) => {
     console.error('Failed to write image pixel data. The error is: ' + error);
   })

   // 场景二:读取并修改指定区域内的图片数据。
   // 固定按照BGRA_8888格式,读取PixelMap指定区域内的图像像素数据,并写入PositionArea.pixels缓冲区中,该区域由PositionArea.region指定。
   const area : image.PositionArea = {
     pixels: new ArrayBuffer(8),
     offset: 0,
     stride: 8,
     region: { size: { height: 1, width: 2 }, x: 0, y: 0 }
   }
   pixelMap.readPixels(area).then(() => {
     console.info('Succeeded in reading the image data in the area.');
   }).catch((error : BusinessError) => {
     console.error('Failed to read the image data in the area. The error is: ' + error);
   })
   // 固定按照BGRA_8888格式,读取PositionArea.pixels缓冲区中的图像像素数据,并写入PixelMap指定区域内,该区域由PositionArea.region指定。
   pixelMap.writePixels(area).then(() => {
     console.info('Succeeded in writing the image data in the area.');
   }).catch((error : BusinessError) => {
     console.error('Failed to write the image data in the area. The error is: ' + error);
   })
开发示例-复制(深拷贝)新的PixelMap
完成图片解码,获取PixelMap位图对象。
复制(深拷贝)一个新的PixelMap。 > 说明: > 创建新PixelMap时,必须将
srcPixelFormat指定为原PixelMap的像素格式,否则新PixelMap的图像会出现异常。”`ts /**
- 复制(深拷贝)一个新的PixelMap *
- @param pixelMap - 被复制的PixelMap。
- @param desiredPixelFormat - 新PixelMap的像素格式。如果不指定,则仍使用原PixelMap的像素格式。
- @returns 新PixelMap。 **/ clonePixelMap(pixelMap: PixelMap, desiredPixelFormat?: image.PixelMapFormat): PixelMap { // 获取当前PixelMap的图片信息。 const imageInfo = pixelMap.getImageInfoSync(); // 读取当前PixelMap的图像像素数据,并按照当前PixelMap的像素格式写入缓冲区数组。 const buffer = new ArrayBuffer(pixelMap.getPixelBytesNumber()); pixelMap.readPixelsToBufferSync(buffer); // 根据当前PixelMap的图片信息,生成初始化选项。 const options: image.InitializationOptions = { // 当前PixelMap的像素格式。 srcPixelFormat: imageInfo.pixelFormat, // 新PixelMap的像素格式。 pixelFormat: desiredPixelFormat ?? imageInfo.pixelFormat, // 当前PixelMap的尺寸大小。 size: imageInfo.size }; // 根据初始化选项和缓冲区数组,生成新PixelMap。 return image.createPixelMapSync(buffer, options); } “`
你可能感兴趣的鸿蒙文章
0
赞
- 所属分类: 后端技术
- 本文标签:
热门推荐
-
2、 优质文章
-
3、 gt
-
7、 openharmony
-
9、 golang
-
10、 Vue中input框自动聚焦