harmony 鸿蒙如何创建子窗口并与主窗口通信
如何创建子窗口并与主窗口通信
场景介绍
应用开发过程中,经常需要创建弹窗(子窗口)用来承载跟当前内容相关的业务,比如电话应用的拨号弹窗;阅读应用中长按当前内容触发的编辑弹窗;购物应用经常出现的抽奖活动弹窗等。 本文为大家介绍如何创建子窗口并实现子窗口与主窗口的数据通信。
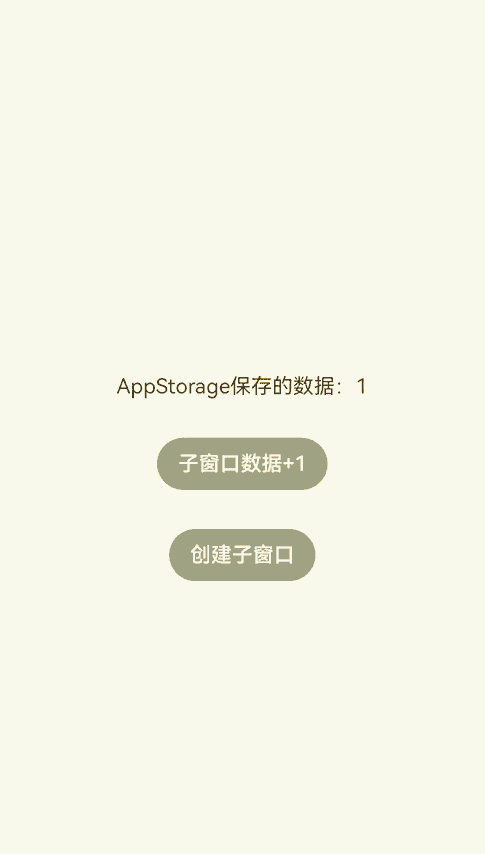
效果呈现
本例最终效果如下:
环境要求
本例基于以下环境开发,开发者也可以基于其他适配的版本进行开发:
- IDE: DevEco Studio 4.0 Beta1
- SDK: Ohos_sdk_public 4.0.7.5 (API Version 10 Beta1)
实现思路
本例关键特性及实现方案如下:
- 点击“创建子窗口”按钮创建子窗口:使用window模块的createSubWindow方法创建子窗口,在创建时设置子窗口的大小、位置、内容等。
- 子窗口可以拖拽:通过gesture属性为子窗口绑定PanGesture拖拽事件,使用moveWindowTo方法将窗口移动到拖拽位置,呈现拖拽效果。
- 点击主窗口的“子窗口数据+1”按钮,子窗口中的数据加1,反之亦然,即实现主窗口和子窗口间的数据通信:将数据变量存储在AppStorage中,在主窗口和子窗口中引用该数据,并通过@StorageLink与AppStorage中的数据进行双向绑定,从而实现主窗口和子窗口之间的数据联动。
>  说明:
> 本文使用AppStorage实现主窗口和子窗口之间的数据传递,除此之外,Emitter和EventHub等方式也可以实现,开发者可以根据实际业务需要进行选择。
说明:
> 本文使用AppStorage实现主窗口和子窗口之间的数据传递,除此之外,Emitter和EventHub等方式也可以实现,开发者可以根据实际业务需要进行选择。
开发步骤
由于本例重点讲解子窗口的创建以及主窗口和子窗口之间的通信,所以开发步骤会着重讲解相关内容的开发,其余内容不做赘述,全量代码可参考完整代码章节。
1. 创建子窗口。
使用createSubWindow方法创建名为“hiSubWindow”的子窗口,并设置窗口的位置、大小、显示内容。将创建子窗口的动作放在自定义成员方法showSubWindow()中,方便后续绑定到按钮上。具体代码如下:
ts
    showSubWindow() {
        // 创建应用子窗口。
        this.windowStage.createSubWindow("hiSubWindow", (err, data) => {
          if (err.code) {
            console.error('Failed to create the subwindow. Cause: ' + JSON.stringify(err));
            return;
          }
          this.sub_windowClass = data;
          console.info('Succeeded in creating the subwindow. Data: ' + JSON.stringify(data));
          // 子窗口创建成功后,设置子窗口的位置
          this.sub_windowClass.moveWindowTo(300, 300, (err) => {
            if (err.code) {
              console.error('Failed to move the window. Cause:' + JSON.stringify(err));
              return;
            }
            console.info('Succeeded in moving the window.');
          });
          // 设置子窗口的大小
          this.sub_windowClass.resize(350, 350, (err) => {
            if (err.code) {
              console.error('Failed to change the window size. Cause:' + JSON.stringify(err));
              return;
            }
            console.info('Succeeded in changing the window size.');
          });
          // 为子窗口加载对应的目标页面。
          this.sub_windowClass.setUIContent("pages/SubWindow",(err) => {
            if (err.code) {
              console.error('Failed to load the content. Cause:' + JSON.stringify(err));
              return;
            }
            console.info('Succeeded in loading the content.');
            // 显示子窗口。
            this.sub_windowClass.showWindow((err) => {
              if (err.code) {
                console.error('Failed to show the window. Cause: ' + JSON.stringify(err));
                return;
              }
              console.info('Succeeded in showing the window.');
            });
            this.sub_windowClass.setWindowBackgroundColor('#E8A027')
          });
        })
      }
2. 实现子窗口可拖拽。
为页面内容绑定PanGesture拖拽事件,拖拽事件发生时获取到触摸点的位置信息,使用@Watch监听到位置变量的变化,然后调用窗口的moveWindowTo方法将窗口移动到对应位置,从而实现拖拽效果。
具体代码如下:
```ts
import window from '@ohos.window';

interface Position {
  x: number,
  y: number
}

@Entry
@Component
struct SubWindow{
  ...
  // 创建位置变量,并使用@Watch监听,变量发生变化调用moveWindow方法移动窗口
  @State @Watch("moveWindow") windowPosition: Position = { x: 0, y: 0 };
  private panOption: PanGestureOptions = new PanGestureOptions({ direction: PanDirection.All });
  private subWindow: window.Window
  // 通过悬浮窗名称“hiSubWindow”获取到创建的悬浮窗
  aboutToAppear() {
    this.subWindow = window.findWindow("hiSubWindow")
  }
  // 将悬浮窗移动到指定位置
  moveWindow() {
    this.subWindow.moveWindowTo(this.windowPosition.x, this.windowPosition.y);
  }

  build(){
    Column(){
      Text(`AppStorage保存的数据:${this.storData}`)
        .fontSize(12)
        .margin({bottom:10})
      Button('主窗口数据+1')
        .fontSize(12)
        .backgroundColor('#A4AE77')
        .onClick(()=>{
          this.storData += 1
        })
    }
    .height('100%')
    .width('100%')
    .alignItems(HorizontalAlign.Center)
    .justifyContent(FlexAlign.Center)
    .gesture(
      PanGesture(this.panOption)
        .onActionStart((event: GestureEvent) => {
          console.info('Pan start');
        })
        // 发生拖拽时,获取到触摸点的位置,并将位置信息传递给windowPosition
        .onActionUpdate((event: GestureEvent) => {
          this.windowPosition.x += event.offsetX;
          this.windowPosition.y += event.offsetY;
        })
        .onActionEnd(() => {
          console.info('Pan end');
        })
    )
  }
}
```
- 实现主窗口和子窗口间的数据通信。本例中即实现点击主窗口的“子窗口数据+1”按钮,子窗口中的数据加1,反之亦然。本例使用应用全局UI状态存储AppStorage来实现对应效果。
- 在创建窗口时触发的onWindowStageCreate回调中将自定义数据变量“data”存入AppStorage。
ts onWindowStageCreate(windowStage: window.WindowStage) { // 将自定义数据变量“data”存入AppStorage AppStorage.SetOrCreate('data', 1); ... windowStage.loadContent('pages/Index', (err, data) => { if (err.code) { hilog.error(0x0000, 'testTag', 'Failed to load the content. Cause: %{public}s', JSON.stringify(err) ?? ''); return; } hilog.info(0x0000, 'testTag', 'Succeeded in loading the content. Data: %{public}s', JSON.stringify(data) ?? ''); }); } - 在主窗口中定义变量“storData”,并使用@StorageLink将其与AppStorage中的变量“data”进行双向绑定,这样一来,“mainData”的变化可以传导至“data”,并且该变化可以被UI框架监听到,从而完成UI状态刷新。
ts ... // 使用@StorageLink将"mainData"与AppStorage中的变量"data"进行双向绑定 @StorageLink('data') mainData: number = 1; ... build() { Row() { Column() { Text(`AppStorage保存的数据:${this.mainData}`) .margin({bottom:30}) Button('子窗口数据+1') .backgroundColor('#A4AE77') .margin({bottom:30}) .onClick(()=>{ // 点击,storData的值加1 this.mainData += 1 }) ... } .width('100%') } .height('100%') } - 在子窗口中定义变量“subData”,并使用@StorageLink将其与AppStorage中的变量“data”进行双向绑定。由于主窗口的“mainData”也与“data”进行了绑定,因此,“mainData”的值可以通过“data”传递给“subData”,反之亦然。这样就实现了主窗口和子窗口之间的数据同步。
ts
...
// 使用@StorageLink将"subData"与AppStorage中的变量"data"进行双向绑定
  @StorageLink('data') subData: number = 1;
...
  build(){
    Column(){
      Text(`AppStorage保存的数据:${this.subData}`)
        .fontSize(12)
        .margin({bottom:10})
      Button('主窗口数据+1')
        .fontSize(12)
        .backgroundColor('#A4AE77')
        .onClick(()=>{
          // 点击,subData的值加1
          this.subData += 1
        })
    }
    ...
  }
- 在创建窗口时触发的onWindowStageCreate回调中将自定义数据变量“data”存入AppStorage。
完整代码
本例完整代码如下: EntryAbility文件代码:
// EntryAbility.ts
import AbilityConstant from '@ohos.app.ability.AbilityConstant';
import hilog from '@ohos.hilog';
import UIAbility from '@ohos.app.ability.UIAbility';
import Want from '@ohos.app.ability.Want';
import window from '@ohos.window';

let sub_windowClass = null;
export default class EntryAbility extends UIAbility {

  destroySubWindow() {
    // 销毁子窗口。当不再需要子窗口时,可根据具体实现逻辑,使用destroy对其进行销毁。
    sub_windowClass.destroyWindow((err) => {
      if (err.code) {
        console.error('Failed to destroy the window. Cause: ' + JSON.stringify(err));
        return;
      }
      console.info('Succeeded in destroying the window.');
    });
  }

  onCreate(want: Want, launchParam: AbilityConstant.LaunchParam) {

    hilog.info(0x0000, 'testTag', '%{public}s', 'Ability onCreate');
  }

  onDestroy() {
    hilog.info(0x0000, 'testTag', '%{public}s', 'Ability onDestroy');
  }

  onWindowStageCreate(windowStage: window.WindowStage) {
    // 将自定义数据变量“data”存入AppStorage
    AppStorage.SetOrCreate('data', 1);
    AppStorage.SetOrCreate('window', windowStage);
    // 为主窗口添加加载页面
    hilog.info(0x0000, 'testTag', '%{public}s', 'Ability onWindowStageCreate');

    windowStage.loadContent('pages/Index', (err, data) => {
      if (err.code) {
        hilog.error(0x0000, 'testTag', 'Failed to load the content. Cause: %{public}s', JSON.stringify(err) ?? '');
        return;
      }
      hilog.info(0x0000, 'testTag', 'Succeeded in loading the content. Data: %{public}s', JSON.stringify(data) ?? '');
    });
  }

  onWindowStageDestroy() {
    this.destroySubWindow();
    hilog.info(0x0000, 'testTag', '%{public}s', 'Ability onWindowStageDestroy');
  }

  onForeground() {
    hilog.info(0x0000, 'testTag', '%{public}s', 'Ability onForeground');
  }

  onBackground() {
    hilog.info(0x0000, 'testTag', '%{public}s', 'Ability onBackground');
  }
}
主窗口代码:
// Index.ets
import window from '@ohos.window';

@Entry
@Component
struct Index {
  // 使用@StorageLink将"mainData"与AppStorage中的变量"data"进行双向绑定
  @StorageLink('data') mainData: number = 1;
  @StorageLink('window') storWindow:window.WindowStage = null
  private windowStage = this.storWindow
  private sub_windowClass = null

  showSubWindow() {
    // 创建应用子窗口。
    this.windowStage.createSubWindow("hiSubWindow", (err, data) => {
      if (err.code) {
        console.error('Failed to create the subwindow. Cause: ' + JSON.stringify(err));
        return;
      }
      this.sub_windowClass = data;
      console.info('Succeeded in creating the subwindow. Data: ' + JSON.stringify(data));
      // 子窗口创建成功后,设置子窗口的位置、大小及相关属性等。
      this.sub_windowClass.moveWindowTo(300, 300, (err) => {
        if (err.code) {
          console.error('Failed to move the window. Cause:' + JSON.stringify(err));
          return;
        }
        console.info('Succeeded in moving the window.');
      });
      this.sub_windowClass.resize(350, 350, (err) => {
        if (err.code) {
          console.error('Failed to change the window size. Cause:' + JSON.stringify(err));
          return;
        }
        console.info('Succeeded in changing the window size.');
      });
      // 为子窗口加载对应的目标页面。
      this.sub_windowClass.setUIContent("pages/SubWindow",(err) => {
        if (err.code) {
          console.error('Failed to load the content. Cause:' + JSON.stringify(err));
          return;
        }
        console.info('Succeeded in loading the content.');
        // 显示子窗口。
        this.sub_windowClass.showWindow((err) => {
          if (err.code) {
            console.error('Failed to show the window. Cause: ' + JSON.stringify(err));
            return;
          }
          console.info('Succeeded in showing the window.');
        });
        this.sub_windowClass.setWindowBackgroundColor('#E8A027')
      });
    })
  }

  build() {
    Row() {
      Column() {
        Text(`AppStorage保存的数据:${this.mainData}`)
          .margin({bottom:30})
        Button('子窗口数据+1')
          .backgroundColor('#A4AE77')
          .margin({bottom:30})
          .onClick(()=>{
            // 点击,storData的值加1
            this.mainData += 1
          })
        Button('创建子窗口')
          .backgroundColor('#A4AE77')
          .onClick(()=>{
            // 点击弹出子窗口
            this.showSubWindow()
          })
      }
      .width('100%')
    }
    .height('100%')
  }
}
子窗口代码:
// SubWindow.ets
import window from '@ohos.window';

interface Position {
  x: number,
  y: number
}

@Entry
@Component
struct SubWindow{
  // 使用@StorageLink将"subData"与AppStorage中的变量"data"进行双向绑定
  @StorageLink('data') subData: number = 1;
  // 创建位置变量,并使用@Watch监听,变量发生变化调用moveWindow方法移动窗口
  @State @Watch("moveWindow") windowPosition: Position = { x: 0, y: 0 };
  private panOption: PanGestureOptions = new PanGestureOptions({ direction: PanDirection.All });
  private subWindow: window.Window
  // 通过悬浮窗名称“hiSubWindow”获取到创建的悬浮窗
  aboutToAppear() {
    this.subWindow = window.findWindow("hiSubWindow")
  }
  // 将悬浮窗移动到指定位置
  moveWindow() {
    this.subWindow.moveWindowTo(this.windowPosition.x, this.windowPosition.y);
  }

  build(){
    Column(){
      Text(`AppStorage保存的数据:${this.subData}`)
        .fontSize(12)
        .margin({bottom:10})
      Button('主窗口数据+1')
        .fontSize(12)
        .backgroundColor('#A4AE77')
        .onClick(()=>{
          // 点击,subData的值加1
          this.subData += 1
        })
    }
    .height('100%')
    .width('100%')
    .alignItems(HorizontalAlign.Center)
    .justifyContent(FlexAlign.Center)
    .gesture(
      PanGesture(this.panOption)
        .onActionStart((event: GestureEvent) => {
          console.info('Pan start');
        })
        // 发生拖拽时,获取到触摸点的位置,并将位置信息传递给windowPosition
        .onActionUpdate((event: GestureEvent) => {
          this.windowPosition.x += event.offsetX;
          this.windowPosition.y += event.offsetY;
        })
        .onActionEnd(() => {
          console.info('Pan end');
        })
    )
  }
}
参考
你可能感兴趣的鸿蒙文章
harmony 鸿蒙使用Badge组件完成聊天未读消息数量显示功能
- 所属分类: 后端技术
- 本文标签:
热门推荐
-
2、 优质文章
-
3、 gt
-
7、 openharmony
-
9、 golang
-
10、 Vue中input框自动聚焦