harmony 鸿蒙Applying for Permissions
Applying for Permissions
When to Use
Application permissions are used to prevent unauthorized access to sensitive data or critical functions. The Ability Privilege Level (APL) of an application can be normal (default), system_basic, or system_core. The permission types include system_grant and user_grant. For details about the application permissions, see the Application Permission List.
This document describes the following operations:
- Declaring Permissions in the Configuration File
- Declaring the ACL
- Requesting User Authorization
- Pre-authorizing user_grant Permissions
Declaring Permissions in the Configuration File
The permissions required by an application must be declared one by one in the configuration file of the project. Otherwise, the application cannot obtain the permissions.
NOTE
If an application of the normal APL requires a permission of the system_basic or system_core level, you must also declare the permission in the ACL.
The following table describes the fields in the configuration file.
| Field | Mandatory | Description |
|---|---|---|
| name | Yes | Name of the permission. |
| reason | No | Reason for applying for the permission. For details, see Specifications for reason. This parameter is mandatory when a user_grant permission is required. |
| usedScene | No | Application scenario of the permission. This parameter is mandatory when a user_grant permission is required. |
| abilities | No | Abilities that require the permission. The value is an array. Applicable model: stage |
| ability | No | Abilities that require the permission. The value is an array. Applicable model: FA |
| when | No | Time when the permission is required. Value: - inuse: The permission is required only when the application is in use. - always: The permission is required no matter whether the application is in use. |
Stage Model
If your application is developed based on the stage model, declare the required permissions in module.json5.
{
  "module" : {
    // ...
    "requestPermissions":[
      {
        "name" : "ohos.permission.PERMISSION1",
        "reason": "$string:reason",
        "usedScene": {
          "abilities": [
            "FormAbility"
          ],
          "when":"inuse"
        }
      },
      {
        "name" : "ohos.permission.PERMISSION2",
        "reason": "$string:reason",
        "usedScene": {
          "abilities": [
            "FormAbility"
          ],
          "when":"always"
        }
      }
    ]
  }
}
FA Model
If your application is developed based on the FA model, declare the required permissions in config.json.
{
  "module" : {
    // ...
    "reqPermissions":[
      {
        "name" : "ohos.permission.PERMISSION1",
        "reason": "$string:reason",
        "usedScene": {
          "ability": [
            "FormAbility"
          ],
          "when":"inuse"
        }
      },
      {
        "name" : "ohos.permission.PERMISSION2",
        "reason": "$string:reason",
        "usedScene": {
          "ability": [
            "FormAbility"
          ],
          "when":"always"
        }
      }
    ]
  }
}
Specifications for reason
The reason field (reason for applying for the permission) is mandatory when a user_grant permission is required. You need to configure each permission required by your application in the application configuration file.
When the user_grant permissions are authorized by the user in a dialog box, the permission group is displayed. For details about the permission groups, see Application Permission List.
The reason field must comply with the following specifications:
- The reason must be clear and concise without redundant separators.
Recommended sentence pattern: Used for something/Used to do something/Used for doing something.
Example: Used for code scanning and photographing.
To ensure optimal user experience, the recommended length of reason is fewer than 72 characters (36 Chinese characters displayed in two lines on the UI) and the maximum length is 256 characters.
If reason is not set, the default reason will be used.
The reason for using a permission is presented in the permission authorization window and Settings. The path for Settings is Settings > Privacy > Permission manager > Permission details of an app.
- If permissions in the Phone, Messaging, Calendar, Contacts, and Call logs permission groups are required, the content and usage of the permissions must be presented to the user.
Sentence pattern: Permissions A and B, used to …
Example: Permission A and permission B, used to obtain the call status and mobile network information and for secure operation and statistics charging services.
- If permissions in other permission groups are required, the reason for using the first permission requested in the permission group is presented to the user. The permissions are listed in the same sequence as they are sorted in permission groups of Permission manager.
Example: If Permission group A = {permission A, permission B, permission C} and {permission C, permission B} are requested, the reason for using permission B is presented to the user.
Declaring the ACL
If an application of the normal APL requires permissions of the system_basic or system_core level, you must also declare the required permissions in the ACL.
For example, if an application needs to access audio clips of a user and capture screenshots, it requires the ohos.permission.WRITE_AUDIO permission (of the system_basic level) and the ohos.permission.CAPTURE_SCREEN permission (of the system_core level). In this case, you need to add the required permissions to the acls field in the HarmonyAppProvision configuration file.
{
	// ...
	"acls":{
		"allowed-acls":[
			"ohos.permission.WRITE_AUDIO",
      "ohos.permission.CAPTURE_SCREEN"
		]
	}
}
Requesting User Authorization
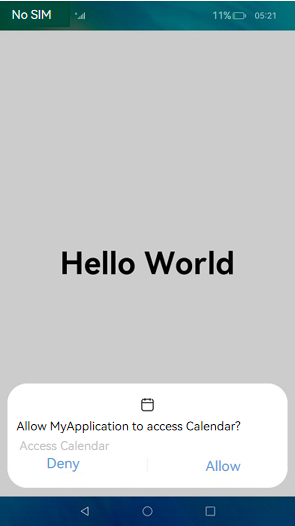
User authorization is required when an application needs to access user privacy information (such as Location or Calendar information) or using system abilities (such as the camera ability to take photos or record videos). In this case, the application requires a user_grant permission. Before the application accesses the data or using the system ability, a verification is performed to check whether the user has granted the permission to the application. If the user has not granted the permission, a dialog box will be displayed to request user authorization. The following figure shows an example.
Figure 1 Requesting user authorization
NOTE
Each time before an API protected by a user_grant permission is called, requestPermissionsFromUser() will be called to request user authorization. After the permission is granted, the user may revoke the authorization in Settings. Therefore, the previous authorization status cannot be persistent.
Stage Model
Example: Apply for the permission for an application to access the Calendar.
Declare the ohos.permission.READ_CALENDAR permission in the configuration file. For details, see Declaring Permissions in the Configuration File.
Check whether the user has granted the permission.
Use checkAccessToken() to check whether the user has granted the permission. If yes, the application can access the Calendar. Otherwise, user authorization is required.
   import bundleManager from '@ohos.bundle.bundleManager';
   import abilityAccessCtrl, { Permissions } from '@ohos.abilityAccessCtrl';
   import { BusinessError } from '@ohos.base';

   async function checkAccessToken(permission: Permissions): Promise<abilityAccessCtrl.GrantStatus> {
     let atManager: abilityAccessCtrl.AtManager = abilityAccessCtrl.createAtManager();
     let grantStatus: abilityAccessCtrl.GrantStatus = abilityAccessCtrl.GrantStatus.PERMISSION_DENIED;

     // Obtain the access token ID of the application.
     let tokenId: number = 0;
     try {
       let bundleInfo: bundleManager.BundleInfo = await bundleManager.getBundleInfoForSelf(bundleManager.BundleFlag.GET_BUNDLE_INFO_WITH_APPLICATION);
       let appInfo: bundleManager.ApplicationInfo = bundleInfo.appInfo;
       tokenId = appInfo.accessTokenId;
     } catch (error) {
       let err: BusinessError = error as BusinessError;
       console.error(`Failed to get bundle info for self. Code is ${err.code}, message is ${err.message}`);
     }

     // Check whether the user has granted the permission.
     try {
       grantStatus = await atManager.checkAccessToken(tokenId, permission);
     } catch (error) {
       let err: BusinessError = error as BusinessError;
       console.error(`Failed to check access token. Code is ${err.code}, message is ${err.message}`);
     }

     return grantStatus;
   }

   async function checkPermissions(): Promise<void> {
     const permissions: Array<Permissions> = ['ohos.permission.READ_CALENDAR'];
     let grantStatus: abilityAccessCtrl.GrantStatus = await checkAccessToken(permissions[0]);

     if (grantStatus === abilityAccessCtrl.GrantStatus.PERMISSION_GRANTED) {
       // If the user has granted the permission, the application can access the Calendar.
     } else {
       // Apply for the permission to access the Calendar.
     }
   }
- Request user authorization dynamically.
Use requestPermissionsFromUser() to apply for permissions from the user when the application is running. A list of permissions, such as the permissions to access the Location, Calendar, camera, and microphone, can be passed in. The user can grant or deny the permissions.
You can have requestPermissionsFromUser() called in onWindowStageCreate() of the UIAbility to dynamically request user authorization, or request user authorization on the UI based on service requirements.
Sample code for requesting user authorization using UIAbility:
   import UIAbility from '@ohos.app.ability.UIAbility';
   import window from '@ohos.window';
   import abilityAccessCtrl, { Context, PermissionRequestResult, Permissions } from '@ohos.abilityAccessCtrl';
   import { BusinessError } from '@ohos.base';

   const permissions: Array<Permissions> = ['ohos.permission.READ_CALENDAR'];
   export default class EntryAbility extends UIAbility {
    // ...
    onWindowStageCreate(windowStage: window.WindowStage) {
      // Main window is created. Set the main page for this ability.
      let context: Context = this.context;
      let atManager: abilityAccessCtrl.AtManager = abilityAccessCtrl.createAtManager();
      // The return value of requestPermissionsFromUser determines whether to display a dialog box to request user authorization.

      atManager.requestPermissionsFromUser(context, permissions).then((data: PermissionRequestResult) => {
        let grantStatus: Array<number> = data.authResults;
        let length: number = grantStatus.length;
        for (let i = 0; i < length; i++) {
          if (grantStatus[i] === 0) {
            // If the user has granted the permission, the application can access the Calendar.
          } else {
            // If the user has not granted the permission, display a message indicating that user authorization is required, and direct the user to the Settings page to set the permission.
            return;
          }
        }
        // The authorization is successful.
      }).catch((err: BusinessError) => {
        console.error(`Failed to request permissions from user. Code is ${err.code}, message is ${err.message}`);
      })
      // ...
    }
   }
Sample code for requesting user authorization on the UI:
   import abilityAccessCtrl, { Context, PermissionRequestResult, Permissions } from '@ohos.abilityAccessCtrl';
   import { BusinessError } from '@ohos.base';

   const permissions: Array<Permissions> = ['ohos.permission.READ_CALENDAR'];

   @Entry
   @Component
   struct Index {
    reqPermissionsFromUser(permissions: Array<Permissions>): void {
      let context: Context = getContext(this) as Context;
      let atManager: abilityAccessCtrl.AtManager = abilityAccessCtrl.createAtManager();
      // The return value of requestPermissionsFromUser determines whether to display a dialog box to request user authorization.
      atManager.requestPermissionsFromUser(context, permissions).then((data: PermissionRequestResult) => {
        let grantStatus: Array<number> = data.authResults;
        let length: number = grantStatus.length;
        for (let i = 0; i < length; i++) {
          if (grantStatus[i] === 0) {
            // If the user has granted the permission, the application can access the Calendar.
          } else {
            // If the user has not granted the permission, display a message indicating that user authorization is required, and direct the user to the Settings page to set the permission.
            return;
          }
        }
        // The authorization is successful.
      }).catch((err: BusinessError) => {
        console.error(`Failed to request permissions from user. Code is ${err.code}, message is ${err.message}`);
      })
    }

    // Page display.
    build() {
      // ...
    }
   }
- Perform subsequent operations based on the authorization result.
After requestPermissionsFromUser() is called, the application waits for the user authorization result. If the user has granted the permission, the application can access the Calendar. If the user has not granted the permission, a message will be displayed indicating that user authorization is required, and the user is directed to Settings to set the permission.
The ArkTS syntax does not support direct use of globalThis. A singleton map is required to enable the use of globalThis. You need to perform the following operations:
a. Import the created singleton object GlobalThis to EntryAbility.ets.
ts
       import {GlobalThis} from '../utils/globalThis'; // Set based on the path of globalThis.ets.
b. Add the following to onCreate:
ts
       GlobalThis.getInstance().setContext('context', this.context);
NOTE
An alert will be generated when a .ets file is imported to a TS file. To prevent the alert, you need to change the file name extension of EntryAbility.ts to EntryAbility.ets and modify the file name extension in module.json5.
The sample code of globalThis.ets is as follows:
   import { Context } from '@ohos.abilityAccessCtrl';

   // Construct a singleton object.
   export class GlobalThis {
     private constructor() {}
     private static instance: GlobalThis;
     private _uiContexts = new Map<string, Context>();

     public static getInstance(): GlobalThis {
       if (!GlobalThis.instance) {
         GlobalThis.instance = new GlobalThis();
       }
       return GlobalThis.instance;
     }

     getContext(key: string): Context|undefined {
       return this._uiContexts.get(key);
     }

     setContext(key: string, value: Context): void {
       this._uiContexts.set(key, value);
     }

     // Set other content to be passed in the same way.
   }
   import { Context } from '@ohos.abilityAccessCtrl';
   import { BusinessError } from '@ohos.base';
   import Want from '@ohos.app.ability.Want';
   import { GlobalThis } from '../utils/globalThis';
   import common from '@ohos.app.ability.common';

   function openPermissionsInSystemSettings(): void {
     let context: Context = GlobalThis.getInstance().getContext('context');
     let wantInfo: Want = {
       action: 'action.settings.app.info',
       parameters: {
         settingsParamBundleName: 'com.example.myapplication' // Open the Details page of the application.
       }
     }
     context.startAbility(wantInfo).then(() => {
       // ...
     }).catch((err: BusinessError) => {
       // ...
     })
   }
FA Model
Call requestPermissionsFromUser() to request user authorization.
import { BusinessError } from '@ohos.base';
import featureAbility from '@ohos.ability.featureAbility';

reqPermissions() {
  let context = featureAbility.getContext();
  let array:Array<string> = ["ohos.permission.PERMISSION2"];
  // The return value of requestPermissionsFromUser determines whether to display a dialog box to request user authorization.
  context.requestPermissionsFromUser(array, 1).then(data => {
      console.log("data:" + JSON.stringify(data));
      console.log("data permissions:" + JSON.stringify(data.permissions));
      console.log("data result:" + JSON.stringify(data.authResults));
  }, (err: BusinessError) => {
      console.error('Failed to start ability', err.code);
  });
}
Pre-authorizing user_grant Permissions
The user_grant permissions can be pre-authorized in the install_list_permission.json file in the /system/etc/app/ directory of the device. When the device starts, it loads the install_list_permission.json file. When the applications are installed, the user_grant permissions are authorized.
The install_list_permissions.json file contains the following fields:
- bundleName: bundle name of the application.
- app_signature: fingerprint information of the application. For details, see Configuration in install_list_capability.json in the Application Privilege Configuration Guide.
- permissions: The name field specifies the name of the user_grant permission to pre-authorize. The userCancellable field specifies whether the user can revoke the pre-authorization. The value true means the user can revoke the pre-authorization; the value false means the opposite.
[
  // ...
  {
    "bundleName": "com.example.myapplication",  // Bundle name.
    "app_signature": ["****"],                  // Fingerprint information.
    "permissions":[
      {
        "name": "ohos.permission.PERMISSION_X", // Permission to pre-authorize.
        "userCancellable": false                // The user cannot revoke the authorization.
      },
      {
        "name": "ohos.permission.PERMISSION_X", // Permission to pre-authorize.
        "userCancellable": true // The user can revoke the authorization.
      }
    ]
  }
]
你可能感兴趣的鸿蒙文章
harmony 鸿蒙Access Control (Permission) Overview
harmony 鸿蒙HarmonyAppProvision Configuration File
harmony 鸿蒙Certificate Development
harmony 鸿蒙Certificate Overview
harmony 鸿蒙Crypto Framework Development
- 所属分类: 后端技术
- 本文标签:
热门推荐
-
2、 优质文章
-
3、 gt
-
7、 openharmony
-
9、 golang
-
10、 Vue中input框自动聚焦