harmony 鸿蒙Resource Categories and Access
Resource Categories and Access
During application development, you may need to use different resources, such as colors, fonts, spacing, and icons, based on the device or configuration. Depending on the resource type, you can achieve this using the following methods:
Application resources: configure device- or configuration-specific resources in the resource files.
System resources: Obtain the ID and configuration-specific values of colors, fonts, or other resources in Resources; obtain system icons in HarmonyOS Symbol.
Resource Categories
Resource files used during application development must be stored in specified directories for management. There are two types of resource directories, namely, resource directories and resource group directories. The resource directories are the base, qualifiers, rawfile, and resfile directories. The resource group directories are the element, media, and profile directories.
NOTE
The common resource files used across projects in the stage model are stored in the resources directory under AppScope.
Example of the resources directory:
resources
|---base  // Default directory.
||---element
|||---string.json
||---media
|||---icon.png
||---profile
|||---test_profile.json
|---en_GB-vertical-car-mdpi // Example of a qualifiers directory, which needs to be created on your own.
||---element
|||---string.json
||---media
|||---icon.png
||---profile
|||---test_profile.json
|---rawfile // Other types of files are saved as raw files and will not be integrated into the resources.index file. You can customize the file name as needed.
|---resfile // Other types of files are saved as raw files and will not be integrated into the resources.index file. You can customize the file name as needed.
Resource Directories
base Directory
The base directory is provided by default. Under this directory, the element subdirectory stores basic elements such as strings, colors, and boolean values, and the media and profile subdirectories store resource files such as media, animations, and layouts.
Resource files in the directories are compiled into binary files, and each resource file is assigned an ID. Access resource files in the directories based on the resource type and resource name.
Qualifiers Directory
The qualifiers directory needs to be created as required. The subdirectories element, media, and profile are used to store basic elements such as character strings, colors, and Boolean values, and resource files such as media, animation, and layout.
Resource files in the directories are compiled into binary files, and each resource file is assigned an ID. Access resource files in the directories based on the resource type and resource name.
Naming Conventions for Qualifiers Directories
The name of a qualifiers directory consists of one or more qualifiers that represent the application scenarios or device characteristics, covering the mobile country code (MCC), mobile network code (MNC), language, script, country or region, screen orientation, device type, night mode, and screen density. The qualifiers are separated using underscores (_) or hyphens (-). Before creating a qualifiers directory, familiarize yourself with the directory naming conventions.
Qualifiers are ordered in the following sequence: MCC_MNC-language_script_country/region-screen orientation-device type-night mode-screen density. You can select one or multiple qualifiers to name your subdirectory based on your application scenarios and device characteristics.
Separation between qualifiers: The language, script, and country/region qualifiers are separated using underscores (_); the MNC and MCC qualifiers are also separated using underscores (_); other qualifiers are separated using hyphens (-). For example, zh_Hant_CN and zh_CN-car-ldpi.
Value range of qualifiers: The value of each qualifier must meet the requirements specified in the following table. Otherwise, the resource files in the resources directory cannot be matched.
Table 2 Requirements for qualifier values
| Qualifier Type | Description and Value Range |
|---|---|
| MCC&MNC | Indicates the MCC and MNC, which are obtained from the network where the device is registered. The MCC can be either followed by the MNC with an underscore (_) in between or be used independently. For example, mcc460 represents China, and mcc460_mnc00 represents China Mobile. For details about the value range, see ITU-T E.212 (the international identification plan for public networks and subscriptions). |
| Language | Indicates the language used by the device. The value consists of two or three lowercase letters. For example, zh indicates Chinese, en indicates English, and mai indicates Maithili. For details about the value range, see ISO 639 (codes for the representation of names of languages). |
| Text | Indicates the script type used by the device. The value starts with one uppercase letter followed by three lowercase letters. For example, Hans indicates simplified Chinese, and Hant indicates traditional Chinese. For details about the value range, see ISO 15924 (codes for the representation of names of scripts). |
| Country/Region | Indicates the country or region where the user is located. The value consists of two or three uppercase letters or three digits. For example, CN indicates China, and GB indicates the United Kingdom. For details about the value range, see ISO 3166-1 (codes for the representation of names of countries and their subdivisions). |
| Screen orientation | Indicates the screen orientation of the device. The value can be: - vertical: portrait orientation - horizontal: landscape orientation |
| Device type | Indicates the device type. The value can be: - car: a telematics device - tablet: tablet - tv: smart TV - wearable: smart wearable |
| Color mode | Indicates the color mode of the device. The value can be: - dark: dark mode - light: light mode |
| Screen density | Indicates the screen density of the device, in dpi. The value can be: - sdpi: small-scale DPI. This value is applicable to devices with a DPI range of (0, 120]. - mdpi: medium-scale DPI. This value is applicable to devices with a DPI range of (120, 160]. - ldpi: large-scale DPI. This value is applicable to devices with a DPI range of (160, 240]. - xldpi: extra-large-scale DPI. This value is applicable to devices with a DPI range of (240, 320]. - xxldpi: extra-extra-large-scale DPI. This value is applicable to devices with a DPI range of (320, 480]. - xxxldpi: extra-extra-extra-large-scale DPI. This value is applicable to devices with a DPI range of (480, 640]. |
rawfile Directory
You can create multiple levels of subdirectories with custom names to store various resource files.
Resource files in the subdirectories are directly packed into the application without being compiled, and no IDs will be assigned to the resource files. Access the directories based on the specified file path and file name.
resfile Directory
You can create multiple levels of subdirectories with custom names to store various resource files.
Resource files in the subdirectories are directly packed into the application without being compiled, and no IDs will be assigned to the resource files. After the application is installed, resources in the resfile repository are decompressed to the application sandbox path. After the resfile directory is obtained through the Context attribute resourceDir, the resources can be accessed through the file path in read-only mode.
Resource Group Directories
Resource group directories include element, media, and profile, which are used to store resources of specific types.
Table 3 Resource group directories
| Directory | Description | Resource File |
|---|---|---|
| element | Element resources. Each type of data is represented by a JSON file. (Only files are supported in this directory.) The options are as follows: - boolean: boolean data - color: color data - float: floating point number ranging from -2^128 to 2^128 - intarray: array of integers - integer: integer ranging from -2^31 to 2^31-1 - pattern: style (for system applications only) - plural: plural form data - strarray: array of strings - string: string. See descriptions for formatting strings. - theme: theme (for system applications only) |
It is recommended that files in the element subdirectory be named the same as the following files, each of which can contain only data of the same type: - boolean.json - color.json - float.json - intarray.json - integer.json - pattern.json - plural.json - strarray.json - string.json |
| media | Indicates media resources, including non-text files such as images, audios, and videos. (Only files are supported in this directory.) Table 4 and Table 5 describe the types of images, audios, and videos. |
The file name can be customized, for example, icon.png. |
| profile | Indicates a custom configuration file. You can obtain the file content by using the getProfileByAbility API. (Only JSON files are supported in this directory.) | The file name can be customized, for example, test_profile.json. |
Media Resource Types
Table 4 Image resource types
| Format | File Name Extension |
|---|---|
| JPEG | .jpg |
| PNG | .png |
| GIF | .gif |
| SVG | .svg |
| WEBP | .webp |
| BMP | .bmp |
Table 5 Audio and video resource types
| Format | File Name Extension |
|---|---|
| H.264 AVC | .3gp |
| Baseline Profile (BP) | .mp4 |
Resource File Examples
The content of the color.json file is as follows:
The standard hexadecimal color value consists of six hexadecimal digits. The first two digits indicate the opacity, and the last six digits indicate the color value.
{
    "color": [
        {
            "name": "color_hello",
            "value": "#ffff0000"
        },
        {
            "name": "color_world",
            "value": "#ff0000ff"
        }
    ]
}
The content of the float.json file is as follows:
{
    "float": [
        {
            "name": "font_hello",
            "value": "28.0fp"
        },
	    {
            "name": "font_world",
            "value": "20.0fp"
        }
    ]
}
The content of the string.json file is as follows:
{
    "string": [
        {
            "name": "string_hello",
            "value": "Hello"
        },
	    {
            "name": "string_world",
            "value": "World"
        },
	    {
            "name": "message_arrive",
            "value": "We will arrive at %1$s."
        },
        {
            "name": "message_notification",
            "value": "Hello, %1$s!,You have %2$d new messages."
        }
    ]
}
The content of the plural.json file is as follows:
{
    "plural": [
        {
            "name": "eat_apple",
            "value": [
                {
                    "quantity": "one",
                    "value": "%d apple"
                },
                {
                    "quantity": "other",
                    "value": "%d apples"
                }
            ]
        }
    ]
}
Creating a Resource Directory and Resource File
You can create a directory and its files under the resources directory based on the naming rules of the qualifiers directory and file types supported by resource group directories. DevEco Studio provides a wizard for you to create resource directories and resource files.
Creating a Resource Directory and Resource File
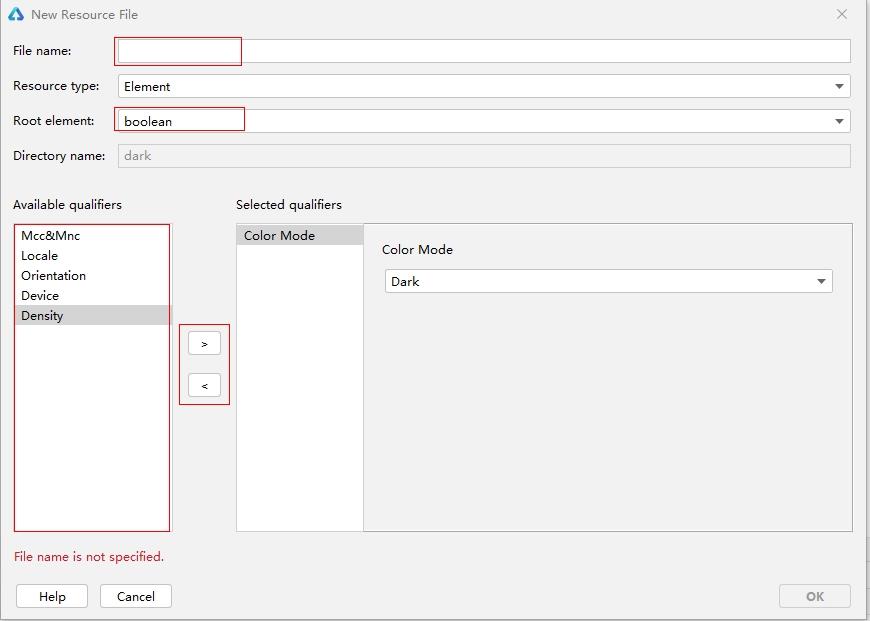
Right-click the resources directory and choose New > Resource File. If no qualifier is selected, the file is created in a resource group directory under base. If one or more qualifiers are selected, the system automatically generates a subdirectory and creates the file in this subdirectory.
In File name, enter the name of the resource file to create. In Resource type, select the type of the resource group, which is element by default. In Root Element, select a resource type. To select a qualifier, highlight it under Available qualifiers and click the right arrow. To deselect a qualifier, highlight it under Selected qualifiers and click the left arrow.
The created directory is automatically named in the format of Qualifiers.Resource group type. For example, if you create a directory by setting Color Mode to Dark and Resource type to Element, the system automatically generates a directory named dark/element.
Creating a Resource Directory
Right-click the resources directory and choose New > Resource Directory to create a directory only. By default, the base directory is created. You can create qualifiers directories as required, by specifying the qualifier and resource group type, including element, media, and profile.

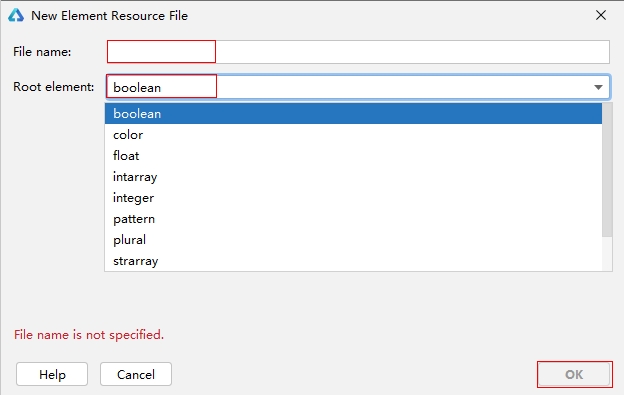
Creating a Resource File
Right-click a directory under resources and choose New > XXX Resource File. This operation creates a resource file under this directory. For example, you can create an element resource file in the element subdirectory.
Using the attr Attribute for Resource Translation
Function Description
If the string resource referenced by an application needs to support multi-language adaptation, the attr attribute can be used to mark the translation scope and status of the string. The attr attribute is not involved in resource compilation.
If the attr attribute is not configured, a string is translated by default.
Parameters of attr
| Name | Type | Description |
|---|---|---|
| translatable | boolean | Whether the string needs to be translated. true: The string needs to be translated. false: The string does not need to be translated. |
| priority | string | Translation status of the string. code: untranslated translate: translated but not verified LT: translated and verified customer: custom |
Constraints
The attr attribute applies to the string, strarray, and plural resources in the base directory.
resources
|---base
||---element
|||---string.json
|||---strarray.json
|||---plural.json
Example
The following shows the attr attribute configured in string. The string1 string is marked as not to be translated, and the string2 string is marked as to be translated and the translation has been verified.
{
  "string": [
    {
      "name": "string1",
      "value": "1",
      "attr": {
        "translatable": false
      }
    },
    {
      "name": "string2",
      "value": "Hello world!",
      "attr": {
        "translatable": true,
        "priority": "LT"
      }
    }
  ]
}
Resource Access
HAP Resources
- Access resources through $r() or $rawfile().
Resources of the color, float, string, plural, media and profile types are accessed through $r(‘app.type.name’), in which app indicates the resource defined in the resources directory, type indicates the resource type, and name indicates the resource name.
To access strings with multiple placeholders in the string.json file, use the “$r(‘app.string.label’,‘aaa’,‘bbb’,444)” format.
To access resources in the rawfile subdirectory, use the “$rawfile(‘filename’)” format. Wherein filename indicates the relative path of a file in the rawfile subdirectory, which must contain the file name extension and cannot start with a slash (/).
NOTE
For details about how to use native APIs to access raw files, see Raw File Development.
As described in Resource Group Directories, you can reference .json resource files, including color.json, string.json, and plural.json.
The usage is as follows:
    // Access through $r('app.type.name').
    Text($r('app.string.string_hello'))
    .fontColor($r('app.color.color_emphasize'))
    .fontSize($r('app.float.text_size_headline1'))
    .fontFamily($r('app.string.font_family_medium'))
    .backgroundColor($r('app.color.color_palette_aux1'))

    Image($r('app.media.app_icon'))
    .border({
      color: $r('app.color.color_palette_aux1'),
      radius: $r('app.float.corner_radius_button'), width: 2
    })
    .margin({
      top: $r('app.float.elements_margin_horizontal_m'),
      bottom: $r('app.float.elements_margin_horizontal_l')
    })
    .height(200)
    .width(300)

    //Access placeholders through $r('app.string.label','aaa','bbb',444).
    Text($r('app.string.message_notification','LiHua',2))
- Obtain a ResourceManager object through the application context, and then call resource management APIs to access different resources.
For example, call getContext().resourceManager.getStringByNameSync(‘test’) to obtain string resources; call getContext().resourceManager.getRawFd(‘rawfilepath’) to obtain the descriptor of the HAP where a raw file is located, and then use the descriptor ({fd, offset, length}) to access the raw file.
Cross-HAP/HSP Resources
Cross-Bundle Access (for System Applications Only)
- Create the context of the HAP/HSP file through createBundleContext(context, bundleName). After obtaining the resourceManager object, call resource management APIs to access different resources.
Inter-Bundle, Cross-Module Access
Create the context of different modules in an application through createModuleContext(context, moduleName). After obtaining the resourceManager object, call resource management APIs to access different resources.
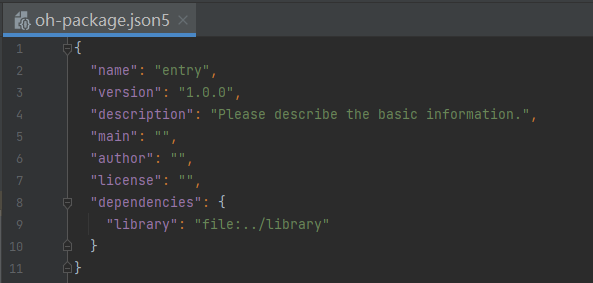
Access resources through $r() or $rawfile(). Specifically, perform either of the following:
Add dependencies to the oh-package.json5 file in the entry directory. For example, “dependencies”: {“library”:“file”:../library}.
Use [hsp].type.name, where hsp indicates the HSP module name, type indicates the resource type, and name indicates the resource name. The following is an example:
Text($r('[hsp].string.test_string')) .fontSize($r('[hsp].float.font_size')) .fontColor($r('[hsp].color.font_color')) Image($rawfile('[hsp].icon.png'))- Use variables. The following is an example:
    @Entry
    @Component
    struct Index {
      text: string = '[hsp].string.test_string';
      fontSize: string = '[hsp].float.font_size';
      fontColor: string = '[hsp].color.font_color';
      image: string = '[hsp].media.string';
      rawfile: string = '[hsp].icon.png';

      build() {
        Row() {
          Text($r(this.text))
            .fontSize($r(this.fontSize))
            .fontColor($r(this.fontColor))

          Image($r(this.image))

          Image($rawfile(this.rawfile))
        }
      }
    }
NOTE
The HSP module name must be placed in the brackets ([]). If the rawfile directory contains multiple levels of folders, the path must start from the first level, for example, $rawfile(‘[hsp].oneFile/twoFile/icon.png’). When $r or $rawfile is used for cross-HSP resource access, resource verification is not available at compile time, and you need to manually check that the target resources exist in the corresponding location.
System Resources
You can obtain the ID and configuration-specific values of colors, fonts, or other resources in Resources, obtain system icons in HarmonyOS Symbol, and further set the icon colors through SymbolGlyph.
To access system resources, use the “$r(‘sys.type.resource_name’)” format, where sys indicates the system resource, type indicates the resource type, such as color, float, string, media, or symbol, and resource_name indicates the resource name.
NOTE
The use of system resources is only supported in the declarative development paradigm.
For preset applications, you are advised to use system resources. For third-party applications, you can choose to use system resources or custom application resources as required.
Currently, when the system font loaded on the UI is displayed (you can view the font in the system/etc/fontconfig.json file), the default font is HarmonyOS Sans and follows the standards Chinese coded character set GB18030-2022.
Text('Hello')
  .fontColor($r('sys.color.ohos_id_color_emphasize'))
  .fontSize($r('sys.float.ohos_id_text_size_headline1'))
  .fontFamily($r('sys.string.ohos_id_text_font_family_medium'))
  .backgroundColor($r('sys.color.ohos_id_color_palette_aux1'))

Image($r('sys.media.ohos_app_icon'))
  .border({
    color: $r('sys.color.ohos_id_color_palette_aux1'),
    radius: $r('sys.float.ohos_id_corner_radius_button'), width: 2
  })
  .margin({
    top: $r('sys.float.ohos_id_elements_margin_horizontal_m'),
    bottom: $r('sys.float.ohos_id_elements_margin_horizontal_l')
  })
  .height(200)
  .width(300)
Resource Matching
When your application needs to use a resource, the system preferentially searches the qualifiers subdirectories that match the current device state. The system searches the base subdirectory for the target resource only when the resources directory does not contain any qualifiers subdirectories that match the current device state or the target resource is not found in the qualifiers subdirectories. The rawfile directory is not searched for resources.
Rules for Matching Qualifiers Subdirectories and Device Resources
Qualifiers are matched with the device resources in the following priorities: MCC&MNC > locale (options: language, language_script, language_country/region, and language_script_country/region) > screen orientation > device type > color mode > screen density
If the qualifiers subdirectories contain the MCC, MNC, language, script, screen orientation, device type, and color mode qualifiers, their values must be consistent with the current device status so that the subdirectories can be used for matching the device resources. For example, the qualifiers subdirectory zh_CN-car-ldpi cannot be used for matching the resource files labeled en_US.
If there are multiple qualifiers subdirectories for the screen density, the closest qualifiers are matched upwards; otherwise, downwards. For example, if qualifiers directories xldpi and xxldpi exist and the device screen density is xxldpi, the qualifier directory xxldpi will be matched.
For more information about how resources are loaded in applications, see the internationalization and localization documents.
Obtaining Resources for a Specific Configuration
Background
You can add qualifiers to the project-level resources directory to meet different system settings such as multi-language support and dark and light color modes. you may find some resources fail to be obtained due to matching rules of the qualifiers directories.
If this is the case, you can use the following APIs to obtain resources for a specific configuration.
Available APIs
| API | Description |
|---|---|
| getOverrideResourceManager(configuration?: Configuration) : ResourceManager | Obtains a ResourceManager object for loading resources for a specific configuration. This API returns the result synchronously. |
| getOverrideConfiguration() : Configuration | Obtains the specified configuration. This API returns the result synchronously. |
| updateOverrideConfiguration(configuration: Configuration) : void | Updates the specified configuration. |
Example
The following example demonstrates how to obtain the resources for languages other than the one in use. Assume that the following resource files with the same name are defined in the resources directories for Chinese, English, and German:
- entry/src/main/resources/zh_CN/element/string.json
{
  "string": [
    {
      "name": "greetings",
      "value": "你好,世界"
    }
  ]
}
- entry/src/main/resources/en_US/element/string.json
{
  "string": [
    {
      "name": "greetings",
      "value": "Hello, world"
    }
  ]
}
- entry/src/main/resources/de_DE/element/string.json
{
  "string": [
    {
      "name": "greetings",
      "value": "Hallo, Welt"
    }
  ]
}
In Index.ets, add code to obtain the resources of the three languages and display them in the text box. The current system language is Chinese. The following is sample code in entry/src/main/ets/pages/Index.ets:
@Entry
@Component
struct Index {
  @State englishString: string = ""
  @State germanString: string = ""

  getString(): string {
    let resMgr = getContext().resourceManager
    let resId = $r('app.string.greetings').id

    // Obtain resources that match the current system configuration, including the color mode and resolution, for the current system language.
    let currentLanguageString = resMgr.getStringSync(resId)

    // Obtain resources that match the current system configuration, including the color mode and resolution, for the English language.
    let overrideConfig = resMgr.getOverrideConfiguration()
    overrideConfig.locale = "en_US" // Set the language to English and locale to US.
    let overrideResMgr = resMgr.getOverrideResourceManager(overrideConfig)
    this.englishString = overrideResMgr.getStringSync(resId)

    // Obtain resources that match the current system configuration, including the color mode and resolution, for the German language.
    overrideConfig.locale = "de_DE" // Set the language to German and locale to DE.
    overrideResMgr.updateOverrideConfiguration(overrideConfig) // Equivalent to resMgr.updateOverrideConfiguration(overrideConfig).
    this.germanString = overrideResMgr.getStringSync(resId)

    return currentLanguageString
  }

  build() {
    Row() {
      Column() {
        Text(this.getString())
          .fontSize(50)
          .fontWeight(FontWeight.Bold)
        Text(this.englishString)
          .fontSize(50)
          .fontWeight(FontWeight.Bold)
        Text(this.germanString)
          .fontSize(50)
          .fontWeight(FontWeight.Bold)
      }
      .width('100%')
    }
    .height('100%')
  }
}
Overlay Mechanism
Overlay is a resource replacement mechanism. With overlay resource packages, you can enable your application UI to adapt to different styles of various brands and products, without having to repack your application HAPs. The overlay mechanism works in dynamic and static modes. Overlay resource packages contain only resource files, resource index files, and configuration files.
Using overlay in dynamic mode
Place the overlay resource package in the target application installation path and install the package using hdc install. For example, for the com.example.overlay application, place the overlay resource package in data/app/el1/bundle/public/com.example.overlay/.
The application uses addResource(path) to load overlay resources and uses removeResource(path) to remove overlay resources. The path to an overlay resource consists of the application’s sandbox root directory (obtained through getContext().bundleCodeDir) and the overlay resource bundle name. For example, let path = getContext().bundleCodeDir + “Overlay resource bundle name”, such as /data/storage/el1/bundle/overlayResourcePackageName.
Using overlay in static mode
The app.json5 file in the inter-application overlay resource package supports the following fields: “`{ “app”:{ “bundleName”: “com.example.myapplication.overlay”, “vendor” : “example”, “versionCode”: “1000000”, “versionName”: “1.0.0.1”, “icon”: “$media:app_icon”, “label”: “$string:app_name”, } }
The **module.json5** file in the inter-application overlay resource package supports the following fields:
```{
  "module":{
    "name": "entry_overlay_module_name",
    "type": "shared",
    "description": "$string:entry_overlay_desc",
    "deviceTypes": [
      "default",
      "tablet",
    ],
    "deliverywithInstall": true,

    "targetModuleName": "entry_module_name",
    "targetPriority": 1,
  }
}
The app.json5 file in the cross-application overlay resource package supports the following fields, which are available for system applications only: “`{ “app”:{ “bundleName”: “com.example.myapplication.overlay”, “vendor” : “example”, “versionCode”: “1000000”, “versionName”: “1.0.0.1”, “icon”: “$media:app_icon”, “label”: “$string:app_name”, “targetBundleName”: “com.example.myapplication”, “targetPriority”: 1, } }
The **module.json5** file in the cross-application overlay resource package supports the following fields, which are available for system applications only:
```{
  "module":{
    "name": "entry_overlay_module_name",
    "type": "shared",
    "description": "$string:entry_overlay_desc",
    "deviceTypes": [
      "default",
      "tablet",
    ],
    "deliverywithInstall": true,

    "targetModuleName": "entry_module_name",
    "targetPriority": 1,
  }
}
NOTE - targetBundleName: name of the target application to apply the overlay feature. The value is a string.
targetModuleName: name of the target module to apply the overlay feature. The value is a string.
targetPriority: overlay priority. The value is an integer.
Other fields such as Ability, ExtensionAbility, and Permission are not supported.
The overlay feature does not support JSON images.
If the module.json5 file of a module contains the targetModuleName and targetPriority fields during project creation on DevEco Studio, the module is identified as a module with the overlay feature in the installation phase. Modules with the overlay feature generally provide an overlay resource file for other modules on the device, so that the module specified by targetModuleName can display different colors, labels, themes, and the like by using the overlay resource file in a running phase.
The overlay feature is enabled by default. For details about how to enable and disable this feature, see @ohos.bundle.overlay (overlay).
你可能感兴趣的鸿蒙文章
harmony 鸿蒙Creating an Application Clone
harmony 鸿蒙app.json5 Configuration File
harmony 鸿蒙Structure of the app Tag
harmony 鸿蒙Overview of Application Configuration Files in FA Model
harmony 鸿蒙Overview of Application Configuration Files in Stage Model
harmony 鸿蒙Application Installation, Uninstall, and Update
harmony 鸿蒙Application Package Overview
- 所属分类: 后端技术
- 本文标签:
热门推荐
-
2、 优质文章
-
3、 gt
-
7、 openharmony
-
9、 golang
-
10、 Vue中input框自动聚焦