content: Java,Java SE,Java基础,Java教程,Java程序员进阶之路,Java入门,教程,nio,网络通信
title: 使用Java NIO完成网络通信 shortTitle: 使用Java NIO完成网络通信 category: - Java核心 tag: - Java NIO description: Java程序员进阶之路,小白的零基础Java教程,使用Java NIO完成网络通信 head: - - meta - name: keywords
content: Java,Java SE,Java基础,Java教程,Java程序员进阶之路,Java入门,教程,nio,网络通信
NIO基础继续讲解
回到我们最开始的图:
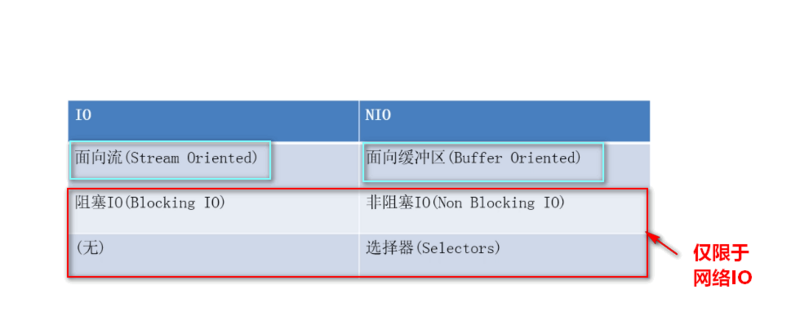
NIO被叫为 no-blocking io,其实是在网络这个层次中理解的,对于FileChannel来说一样是阻塞。
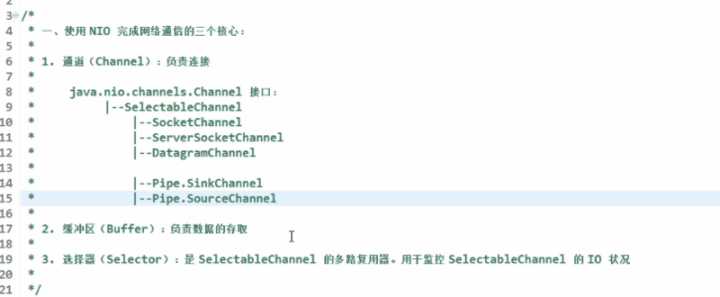
我们前面也仅仅讲解了FileChannel,对于我们网络通信是还有几个Channel的~
所以说:我们通常使用NIO是在网络中使用的,网上大部分讨论NIO都是在网络通信的基础之上的!说NIO是非阻塞的NIO也是网络中体现的!
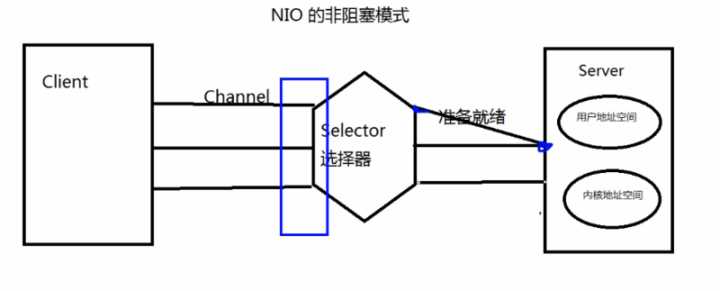
从上面的图我们可以发现还有一个Selector选择器这么一个东东。从一开始我们就说过了,nio的核心要素有:
- Buffer缓冲区
- Channel通道
- Selector选择器
我们在网络中使用NIO往往是I/O模型的多路复用模型!
- Selector选择器就可以比喻成麦当劳的广播。
- 一个线程能够管理多个Channel的状态
NIO阻塞形态
为了更好地理解,我们先来写一下NIO在网络中是阻塞的状态代码,随后看看非阻塞是怎么写的就更容易理解了。
- 是阻塞的就没有Selector选择器了,就直接使用Channel和Buffer就完事了。
客户端:
public class BlockClient {

    public static void main(String[] args) throws IOException {

        // 1. 获取通道
        SocketChannel socketChannel = SocketChannel.open(new InetSocketAddress("127.0.0.1", 6666));

        // 2. 发送一张图片给服务端吧
        FileChannel fileChannel = FileChannel.open(Paths.get("X:\\Users\\ozc\\Desktop\\新建文件夹\\1.png"), StandardOpenOption.READ);

        // 3.要使用NIO,有了Channel,就必然要有Buffer,Buffer是与数据打交道的呢
        ByteBuffer buffer = ByteBuffer.allocate(1024);

        // 4.读取本地文件(图片),发送到服务器
        while (fileChannel.read(buffer) != -1) {

            // 在读之前都要切换成读模式
            buffer.flip();

            socketChannel.write(buffer);

            // 读完切换成写模式,能让管道继续读取文件的数据
            buffer.clear();
        }

        // 5. 关闭流
        fileChannel.close();
        socketChannel.close();
    }
}
服务端:
public class BlockServer {
public static void main(String[] args) throws IOException {
// 1.获取通道
ServerSocketChannel server = ServerSocketChannel.open();
// 2.得到文件通道,将客户端传递过来的图片写到本地项目下(写模式、没有则创建)
FileChannel outChannel = FileChannel.open(Paths.get("2.png"), StandardOpenOption.WRITE, StandardOpenOption.CREATE);
// 3. 绑定链接
server.bind(new InetSocketAddress(6666));
// 4. 获取客户端的连接(阻塞的)
SocketChannel client = server.accept();
// 5. 要使用NIO,有了Channel,就必然要有Buffer,Buffer是与数据打交道的呢
ByteBuffer buffer = ByteBuffer.allocate(1024);
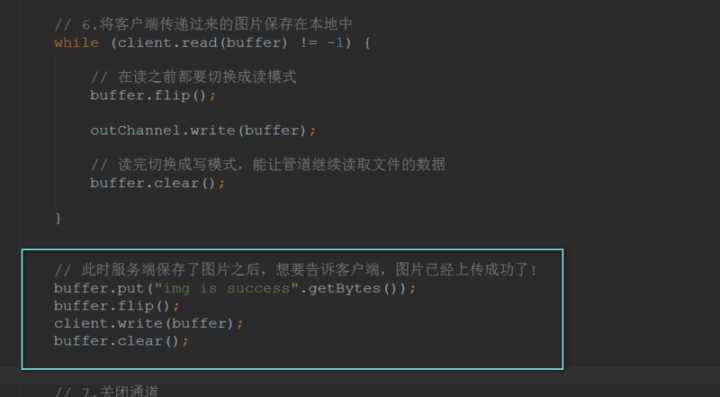
// 6.将客户端传递过来的图片保存在本地中
while (client.read(buffer) != -1) {
// 在读之前都要切换成读模式
buffer.flip();
outChannel.write(buffer);
// 读完切换成写模式,能让管道继续读取文件的数据
buffer.clear();
}
// 7.关闭通道
outChannel.close();
client.close();
server.close();
}
}
结果就可以将客户端传递过来的图片保存在本地了:
此时服务端保存完图片想要告诉客户端已经收到图片啦:
客户端接收服务端带过来的数据:
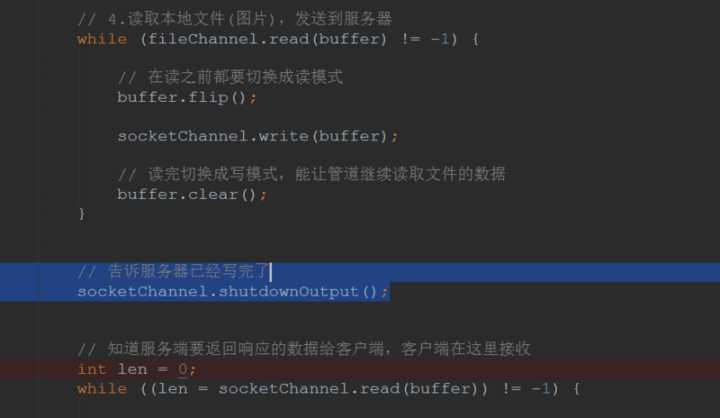
如果仅仅是上面的代码是不行的!这个程序会阻塞起来!
- 因为服务端不知道客户端还有没有数据要发过来(与刚开始不一样,客户端发完数据就将流关闭了,服务端可以知道客户端没数据发过来了),导致服务端一直在读取客户端发过来的数据。
- 进而导致了阻塞!
于是客户端在写完数据给服务端时,显式告诉服务端已经发完数据了!
NIO非阻塞形态
如果使用非阻塞模式的话,那么我们就可以不显式告诉服务器已经发完数据了。我们下面来看看怎么写:
客户端:
public class NoBlockClient {
public static void main(String[] args) throws IOException {
// 1. 获取通道
SocketChannel socketChannel = SocketChannel.open(new InetSocketAddress("127.0.0.1", 6666));
// 1.1切换成非阻塞模式
socketChannel.configureBlocking(false);
// 2. 发送一张图片给服务端吧
FileChannel fileChannel = FileChannel.open(Paths.get("X:\\Users\\ozc\\Desktop\\新建文件夹\\1.png"), StandardOpenOption.READ);
// 3.要使用NIO,有了Channel,就必然要有Buffer,Buffer是与数据打交道的呢
ByteBuffer buffer = ByteBuffer.allocate(1024);
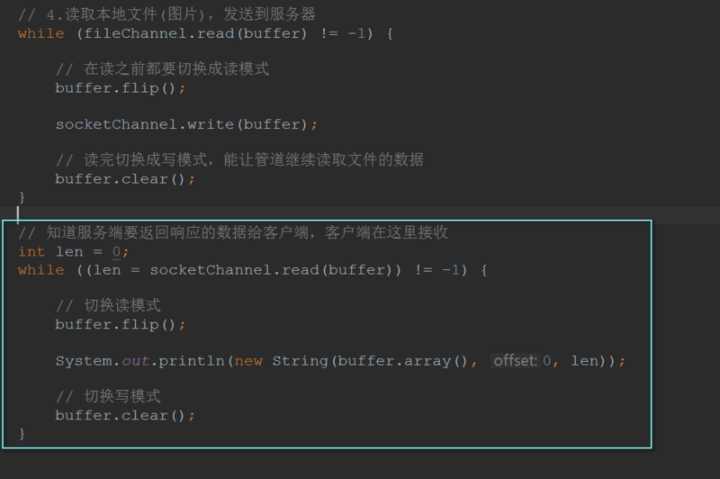
// 4.读取本地文件(图片),发送到服务器
while (fileChannel.read(buffer) != -1) {
// 在读之前都要切换成读模式
buffer.flip();
socketChannel.write(buffer);
// 读完切换成写模式,能让管道继续读取文件的数据
buffer.clear();
}
// 5. 关闭流
fileChannel.close();
socketChannel.close();
}
}
服务端:
public class NoBlockServer {

    public static void main(String[] args) throws IOException {

        // 1.获取通道
        ServerSocketChannel server = ServerSocketChannel.open();

        // 2.切换成非阻塞模式
        server.configureBlocking(false);

        // 3. 绑定连接
        server.bind(new InetSocketAddress(6666));

        // 4. 获取选择器
        Selector selector = Selector.open();

        // 4.1将通道注册到选择器上,指定接收“监听通道”事件
        server.register(selector, SelectionKey.OP_ACCEPT);

        // 5. 轮训地获取选择器上已“就绪”的事件--->只要select()>0,说明已就绪
        while (selector.select() > 0) {
            // 6. 获取当前选择器所有注册的“选择键”(已就绪的监听事件)
            Iterator<SelectionKey> iterator = selector.selectedKeys().iterator();

            // 7. 获取已“就绪”的事件,(不同的事件做不同的事)
            while (iterator.hasNext()) {

                SelectionKey selectionKey = iterator.next();

                // 接收事件就绪
                if (selectionKey.isAcceptable()) {

                    // 8. 获取客户端的链接
                    SocketChannel client = server.accept();

                    // 8.1 切换成非阻塞状态
                    client.configureBlocking(false);

                    // 8.2 注册到选择器上-->拿到客户端的连接为了读取通道的数据(监听读就绪事件)
                    client.register(selector, SelectionKey.OP_READ);

                } else if (selectionKey.isReadable()) { // 读事件就绪
                    // 9. 获取当前选择器读就绪状态的通道
                    SocketChannel client = (SocketChannel) selectionKey.channel();

                    // 9.1读取数据
                    ByteBuffer buffer = ByteBuffer.allocate(1024);

                    // 9.2得到文件通道,将客户端传递过来的图片写到本地项目下(写模式、没有则创建)
                    FileChannel outChannel = FileChannel.open(Paths.get("2.png"), StandardOpenOption.WRITE, StandardOpenOption.CREATE);

                    while (client.read(buffer) > 0) {
                        // 在读之前都要切换成读模式
                        buffer.flip();

                        outChannel.write(buffer);

                        // 读完切换成写模式,能让管道继续读取文件的数据
                        buffer.clear();
                    }
                }
                // 10. 取消选择键(已经处理过的事件,就应该取消掉了)
                iterator.remove();
            }
        }

    }
}
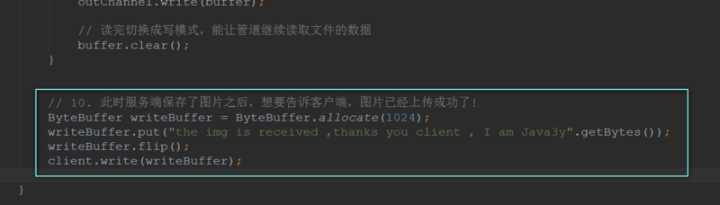
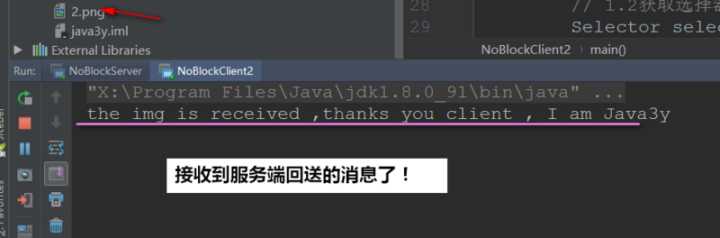
还是刚才的需求:服务端保存了图片以后,告诉客户端已经收到图片了。
在服务端上只要在后面写些数据给客户端就好了:
在客户端上要想获取得到服务端的数据,也需要注册在register上(监听读事件)!
public class NoBlockClient2 {

    public static void main(String[] args) throws IOException {

        // 1. 获取通道
        SocketChannel socketChannel = SocketChannel.open(new InetSocketAddress("127.0.0.1", 6666));

        // 1.1切换成非阻塞模式
        socketChannel.configureBlocking(false);

        // 1.2获取选择器
        Selector selector = Selector.open();

        // 1.3将通道注册到选择器中,获取服务端返回的数据
        socketChannel.register(selector, SelectionKey.OP_READ);

        // 2. 发送一张图片给服务端吧
        FileChannel fileChannel = FileChannel.open(Paths.get("X:\\Users\\ozc\\Desktop\\新建文件夹\\1.png"), StandardOpenOption.READ);

        // 3.要使用NIO,有了Channel,就必然要有Buffer,Buffer是与数据打交道的呢
        ByteBuffer buffer = ByteBuffer.allocate(1024);

        // 4.读取本地文件(图片),发送到服务器
        while (fileChannel.read(buffer) != -1) {

            // 在读之前都要切换成读模式
            buffer.flip();

            socketChannel.write(buffer);

            // 读完切换成写模式,能让管道继续读取文件的数据
            buffer.clear();
        }

        // 5. 轮训地获取选择器上已“就绪”的事件--->只要select()>0,说明已就绪
        while (selector.select() > 0) {
            // 6. 获取当前选择器所有注册的“选择键”(已就绪的监听事件)
            Iterator<SelectionKey> iterator = selector.selectedKeys().iterator();

            // 7. 获取已“就绪”的事件,(不同的事件做不同的事)
            while (iterator.hasNext()) {

                SelectionKey selectionKey = iterator.next();

                // 8. 读事件就绪
                if (selectionKey.isReadable()) {

                    // 8.1得到对应的通道
                    SocketChannel channel = (SocketChannel) selectionKey.channel();

                    ByteBuffer responseBuffer = ByteBuffer.allocate(1024);

                    // 9. 知道服务端要返回响应的数据给客户端,客户端在这里接收
                    int readBytes = channel.read(responseBuffer);

                    if (readBytes > 0) {
                        // 切换读模式
                        responseBuffer.flip();
                        System.out.println(new String(responseBuffer.array(), 0, readBytes));
                    }
                }

                // 10. 取消选择键(已经处理过的事件,就应该取消掉了)
                iterator.remove();
            }
        }
    }

}
测试结果:
下面就简单总结一下使用NIO时的要点:
- 将Socket通道注册到Selector中,监听感兴趣的事件
- 当感兴趣的时间就绪时,则会进去我们处理的方法进行处理
- 每处理完一次就绪事件,删除该选择键(因为我们已经处理完了)
4.4管道和DataGramChannel
这里我就不再讲述了,最难的TCP都讲了,UDP就很简单了。
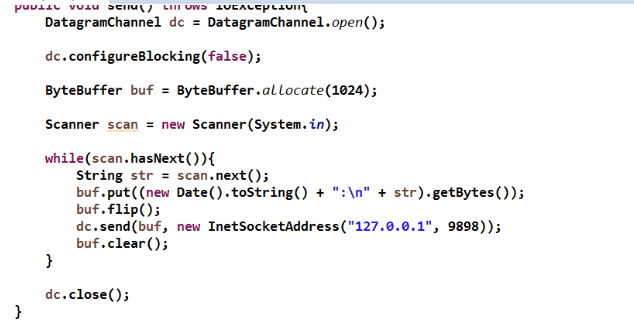
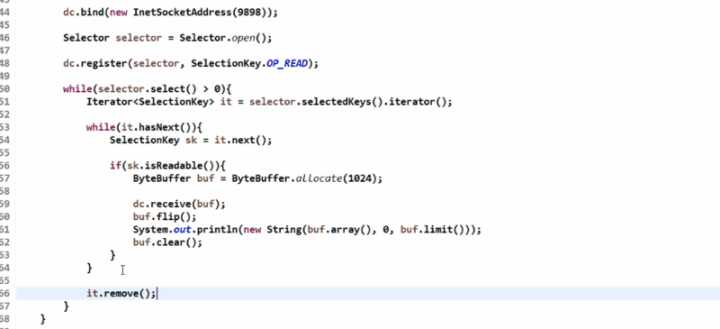
UDP:
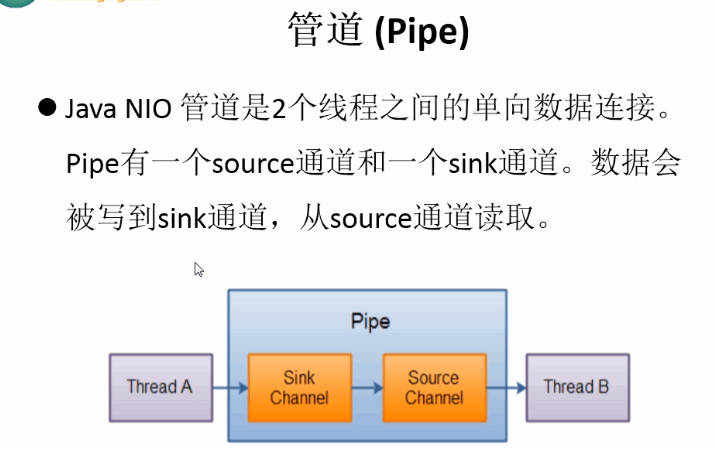
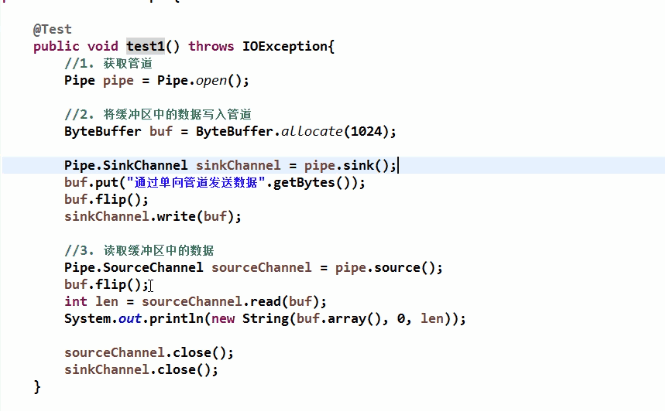
管道:
参考链接:https://www.zhihu.com/question/29005375/answer/667616386,整理:沉默王二
你可能感兴趣的文章
content: Java,Java SE,Java基础,Java教程,Java程序员进阶之路,Java入门,教程,IO,BIO,NIO,AIO
content: Java,Java SE,Java基础,Java教程,Java程序员进阶之路,Java入门,教程,nio,多路复用,阻塞IO
content: Java,Java SE,Java基础,Java教程,Java程序员进阶之路,Java入门,教程,nio,buffer,channel,selector
content: Java,Java SE,Java基础,Java教程,Java程序员进阶之路,Java入门,教程,nio
热门推荐
-
2、 优质文章
-
3、 gt
-
7、 openharmony
-
9、 golang
-
10、 Vue中input框自动聚焦